iFreilicht
About
- Username
- iFreilicht
- Location
- Germany
- Joined
- Visits
- 7
- Last Active
- Roles
- No Roles
- Points
- 7
- Location
- Germany
- Posts
- 39
- 2
- Badges
-
Deluge MIDI Host Mod Buildlog
Current status

Looks awesome, right? Unfortunately, it doesn't quite work. It did, sometimes, if I was lucky, but there were too big issues:
- The whole thing doesn't boot when powered by USB, only when powered by batteries, so no host device could be connected
- RK 005 doesn't connect to hub most of the time and detects no devices, so the hub only outputs power. Lame.
Actual current status
The 555 timer board will power the RK005 after everything else, which for some reason makes it more reliably detect the downstream devices.
So, it's still a work in progress.
Original post
Hi everyone! Bought my deluge a week ago, huge fan, such a powerful and fun device. It's replacing the OP-Z for me, which was much more portable and great fun as well, but ultimately not the right fit for a bunch of reasons.
While the Deluge is more powerful than the OP-Z in a lot of ways, one feature I'm missing quite a bit is the ability to act as a MIDI host. Mind you, it was terribly buggy on the OP-Z (like a lot of things right now), but it was very convenient to just connect a Keystep with just one cable and be ready to go.
So, that's what I will mod into the Deluge. Specifically:
Important Features
- MIDI Host with 4 USB ports - Enable the Deluge to act as a host to MIDI devices
- Provide Power to MIDI devices - All connected USB MIDI devices will be provided with power from the internal battery/power bus
- MIDI thru between USB and DIN - Deluge can already do that (which is awesome, btw), but I need to keep that feature alive
Potential additional Features
- One more CV/Gate/Clock output - Can't have enough of those, can you?
- Battery level indicator - Self explanatory
- MIDI Status LED - Blinks on signal receive
- USB C input jack - I charge most of my stuff with USB C, so that would be a nice modernisation
- Increase battery life by up to 400% - Not sure on the exact number yet, will need to be tested.
How I'm going to achieve that?
Short Story
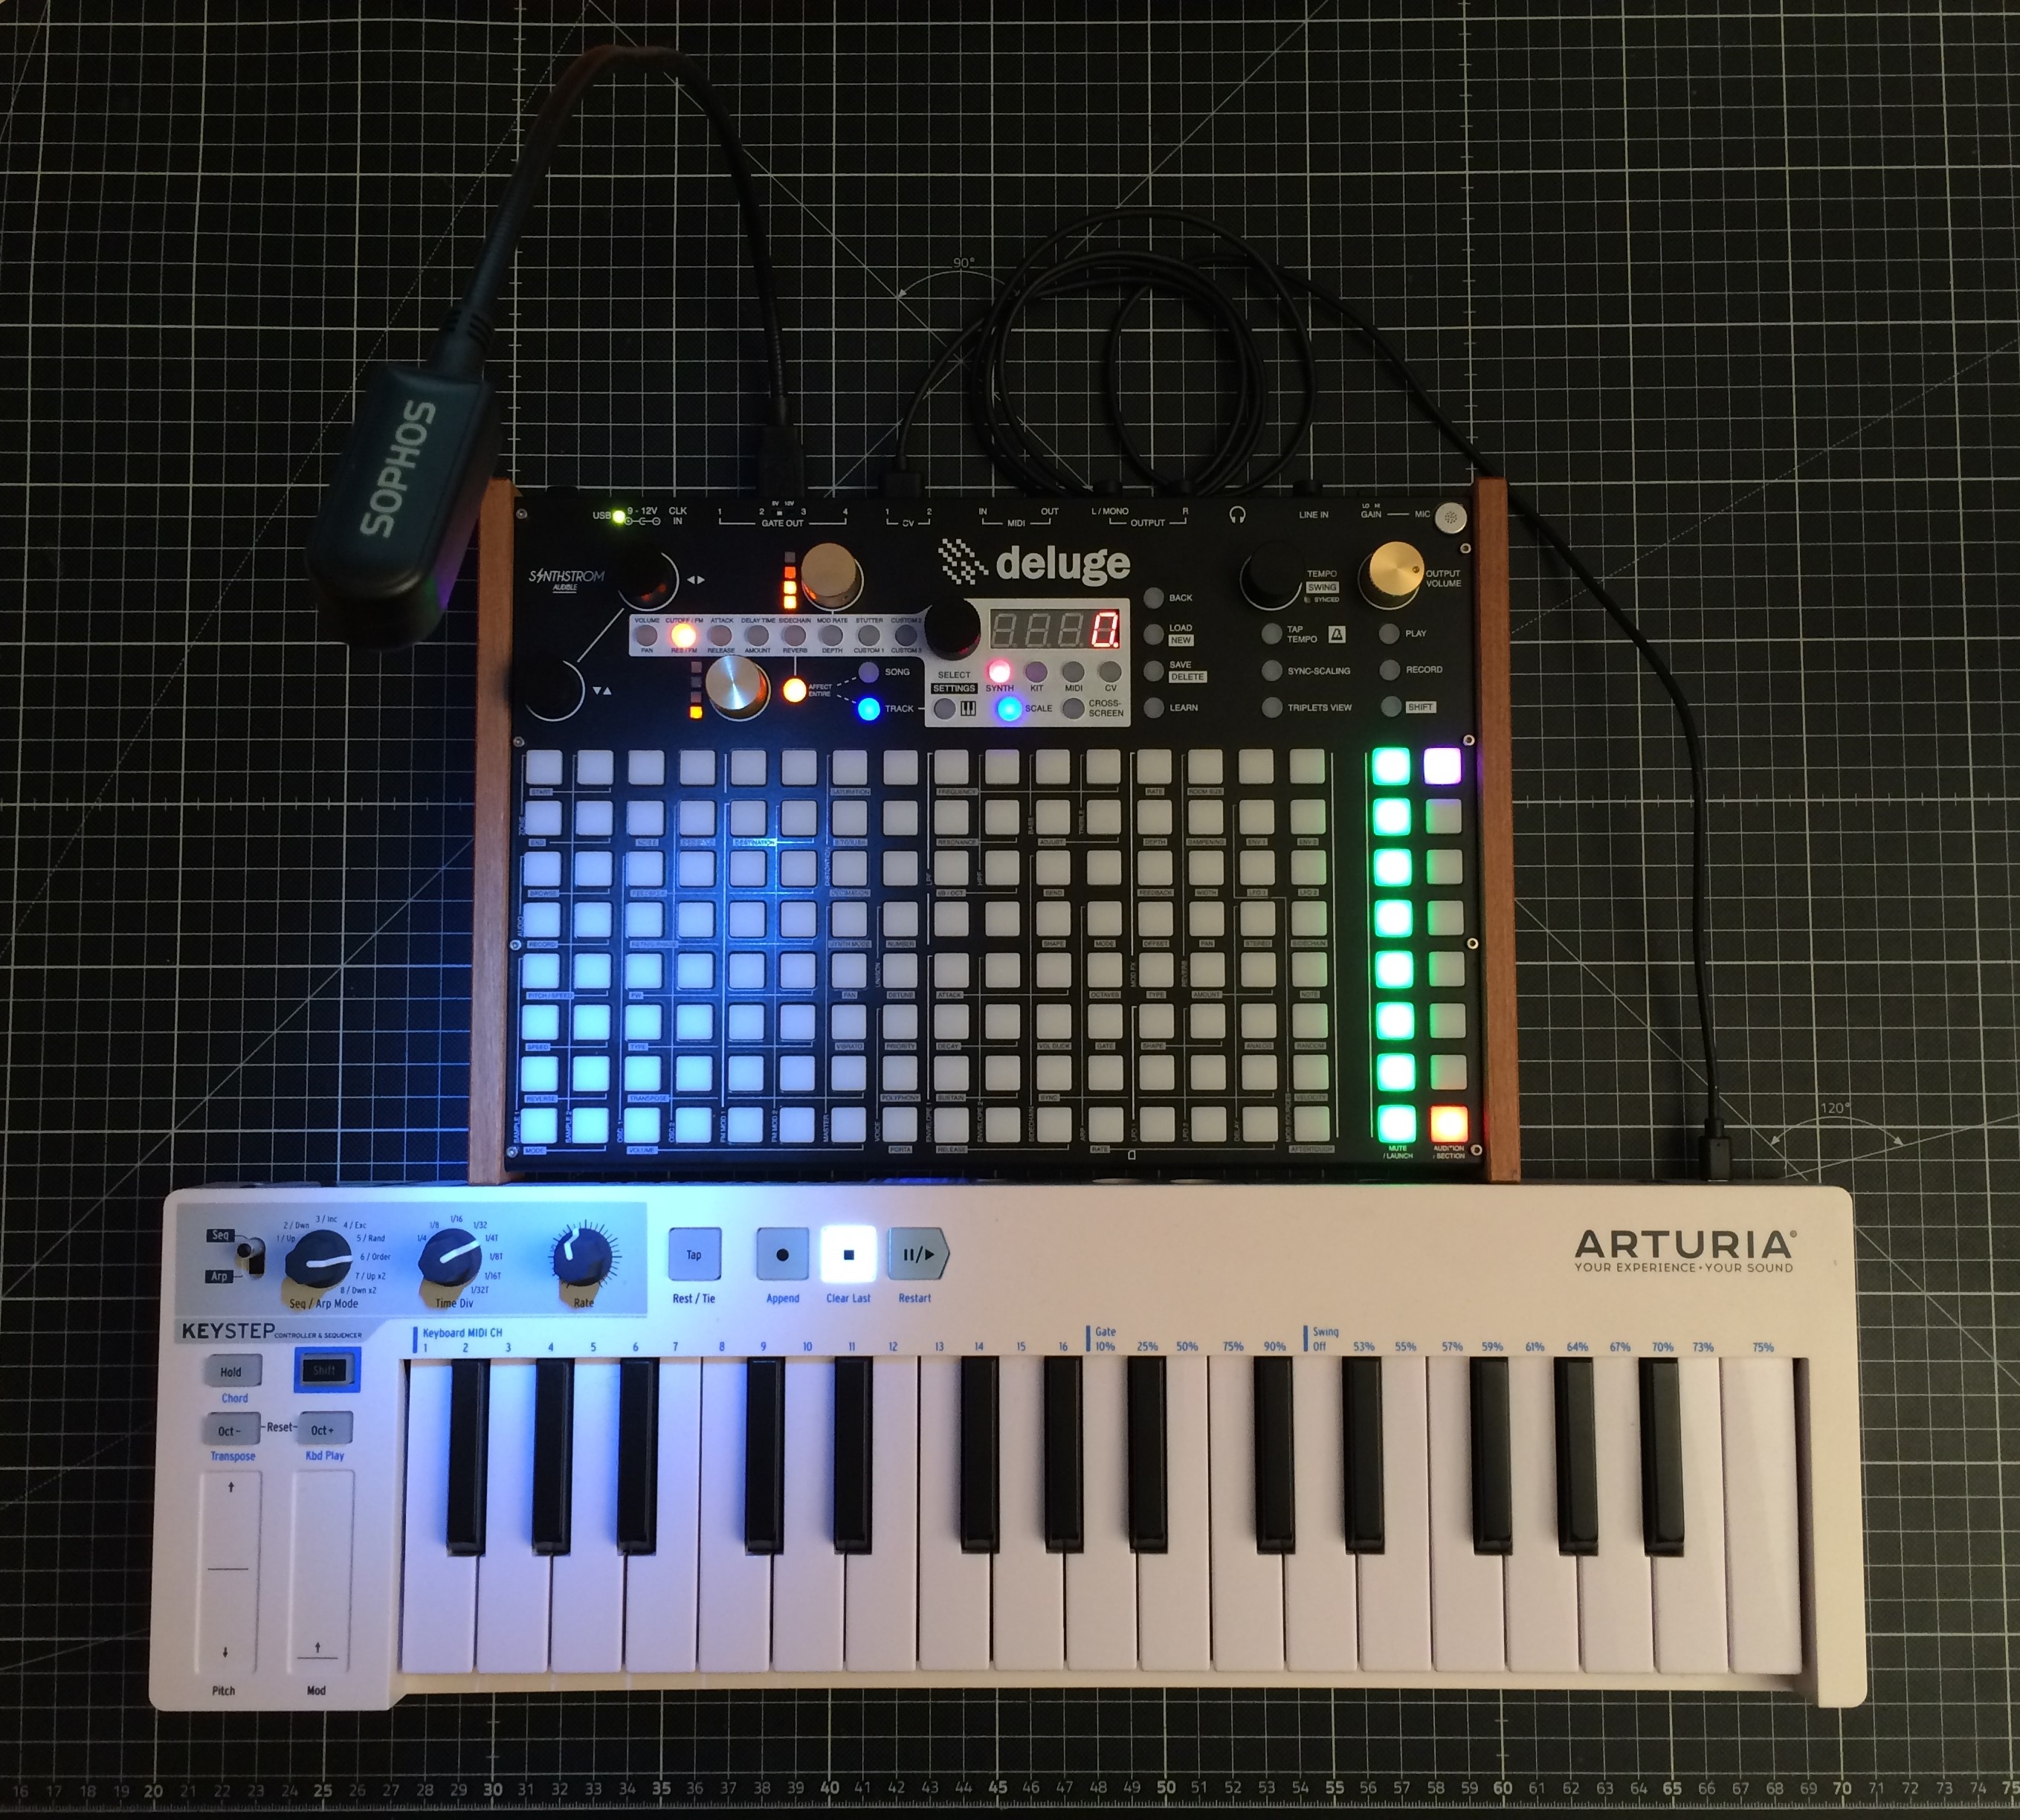
Put an RK 005, a USB Hub and a Powerbank into the Deluge, cut a few holes and solder it together right.
Long Story
Space
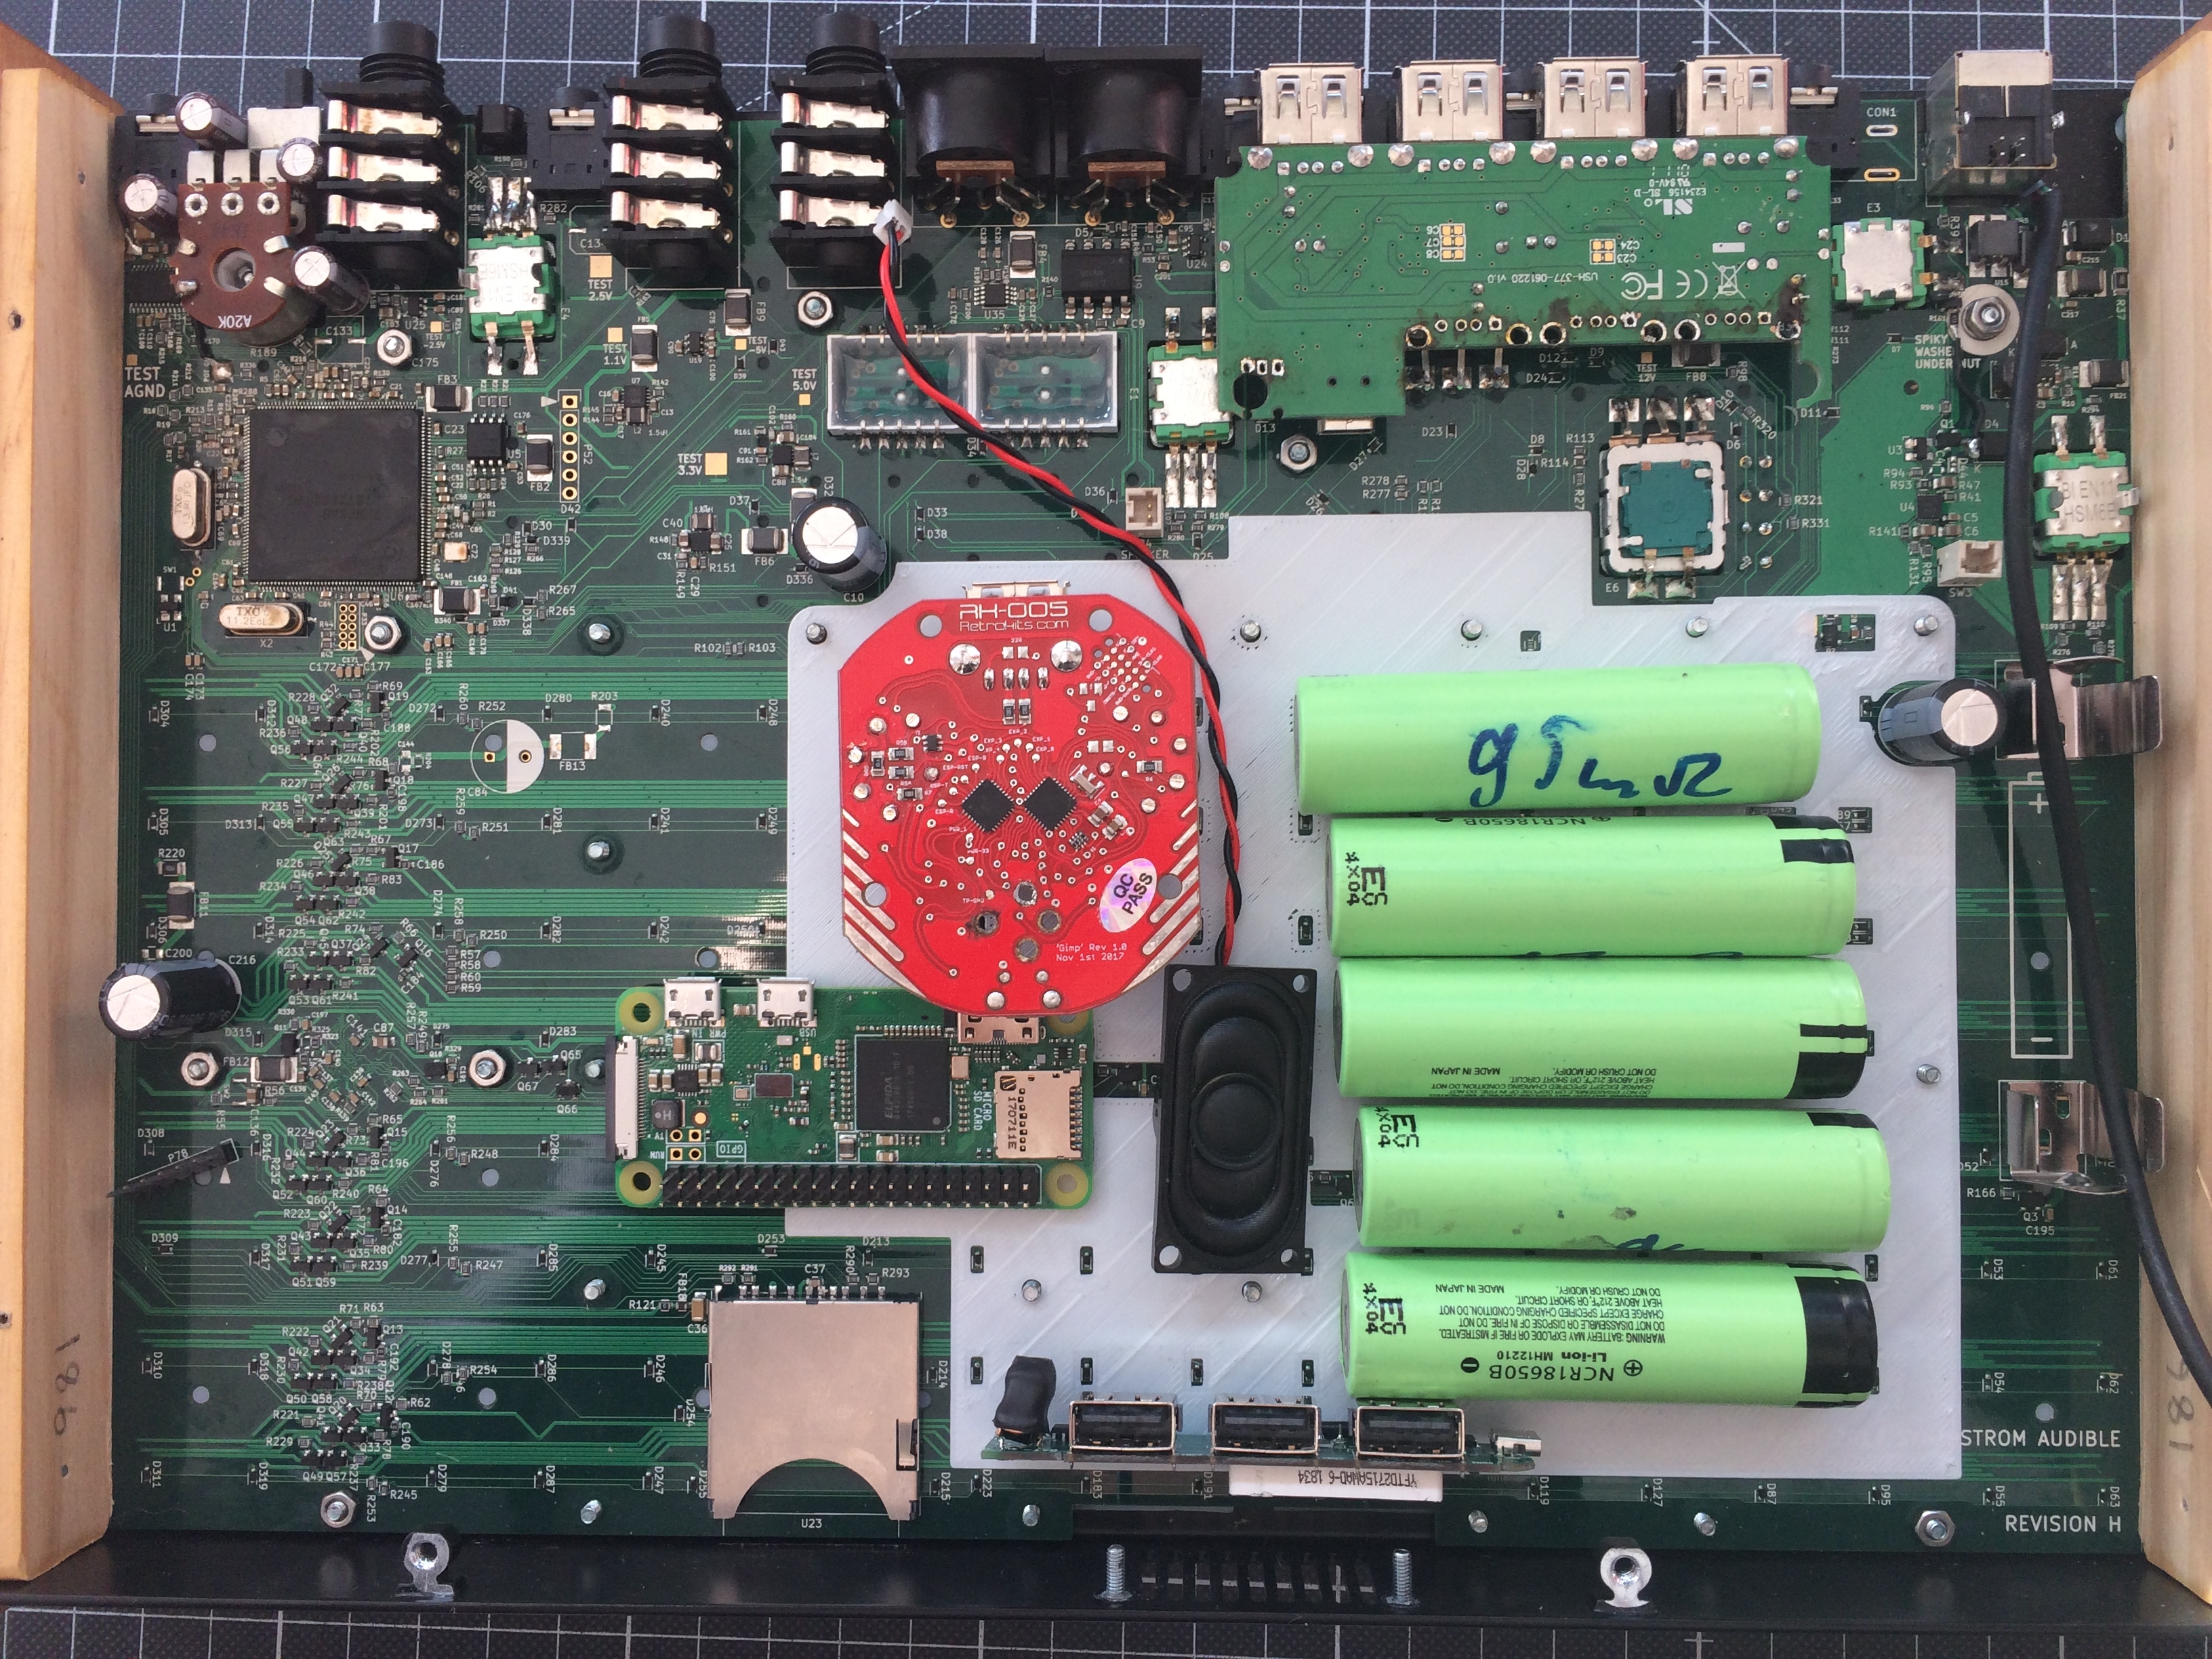
Here you can see what the Deluge looks like with the bottom panel removed. Lots of free space, about 21mm deep.
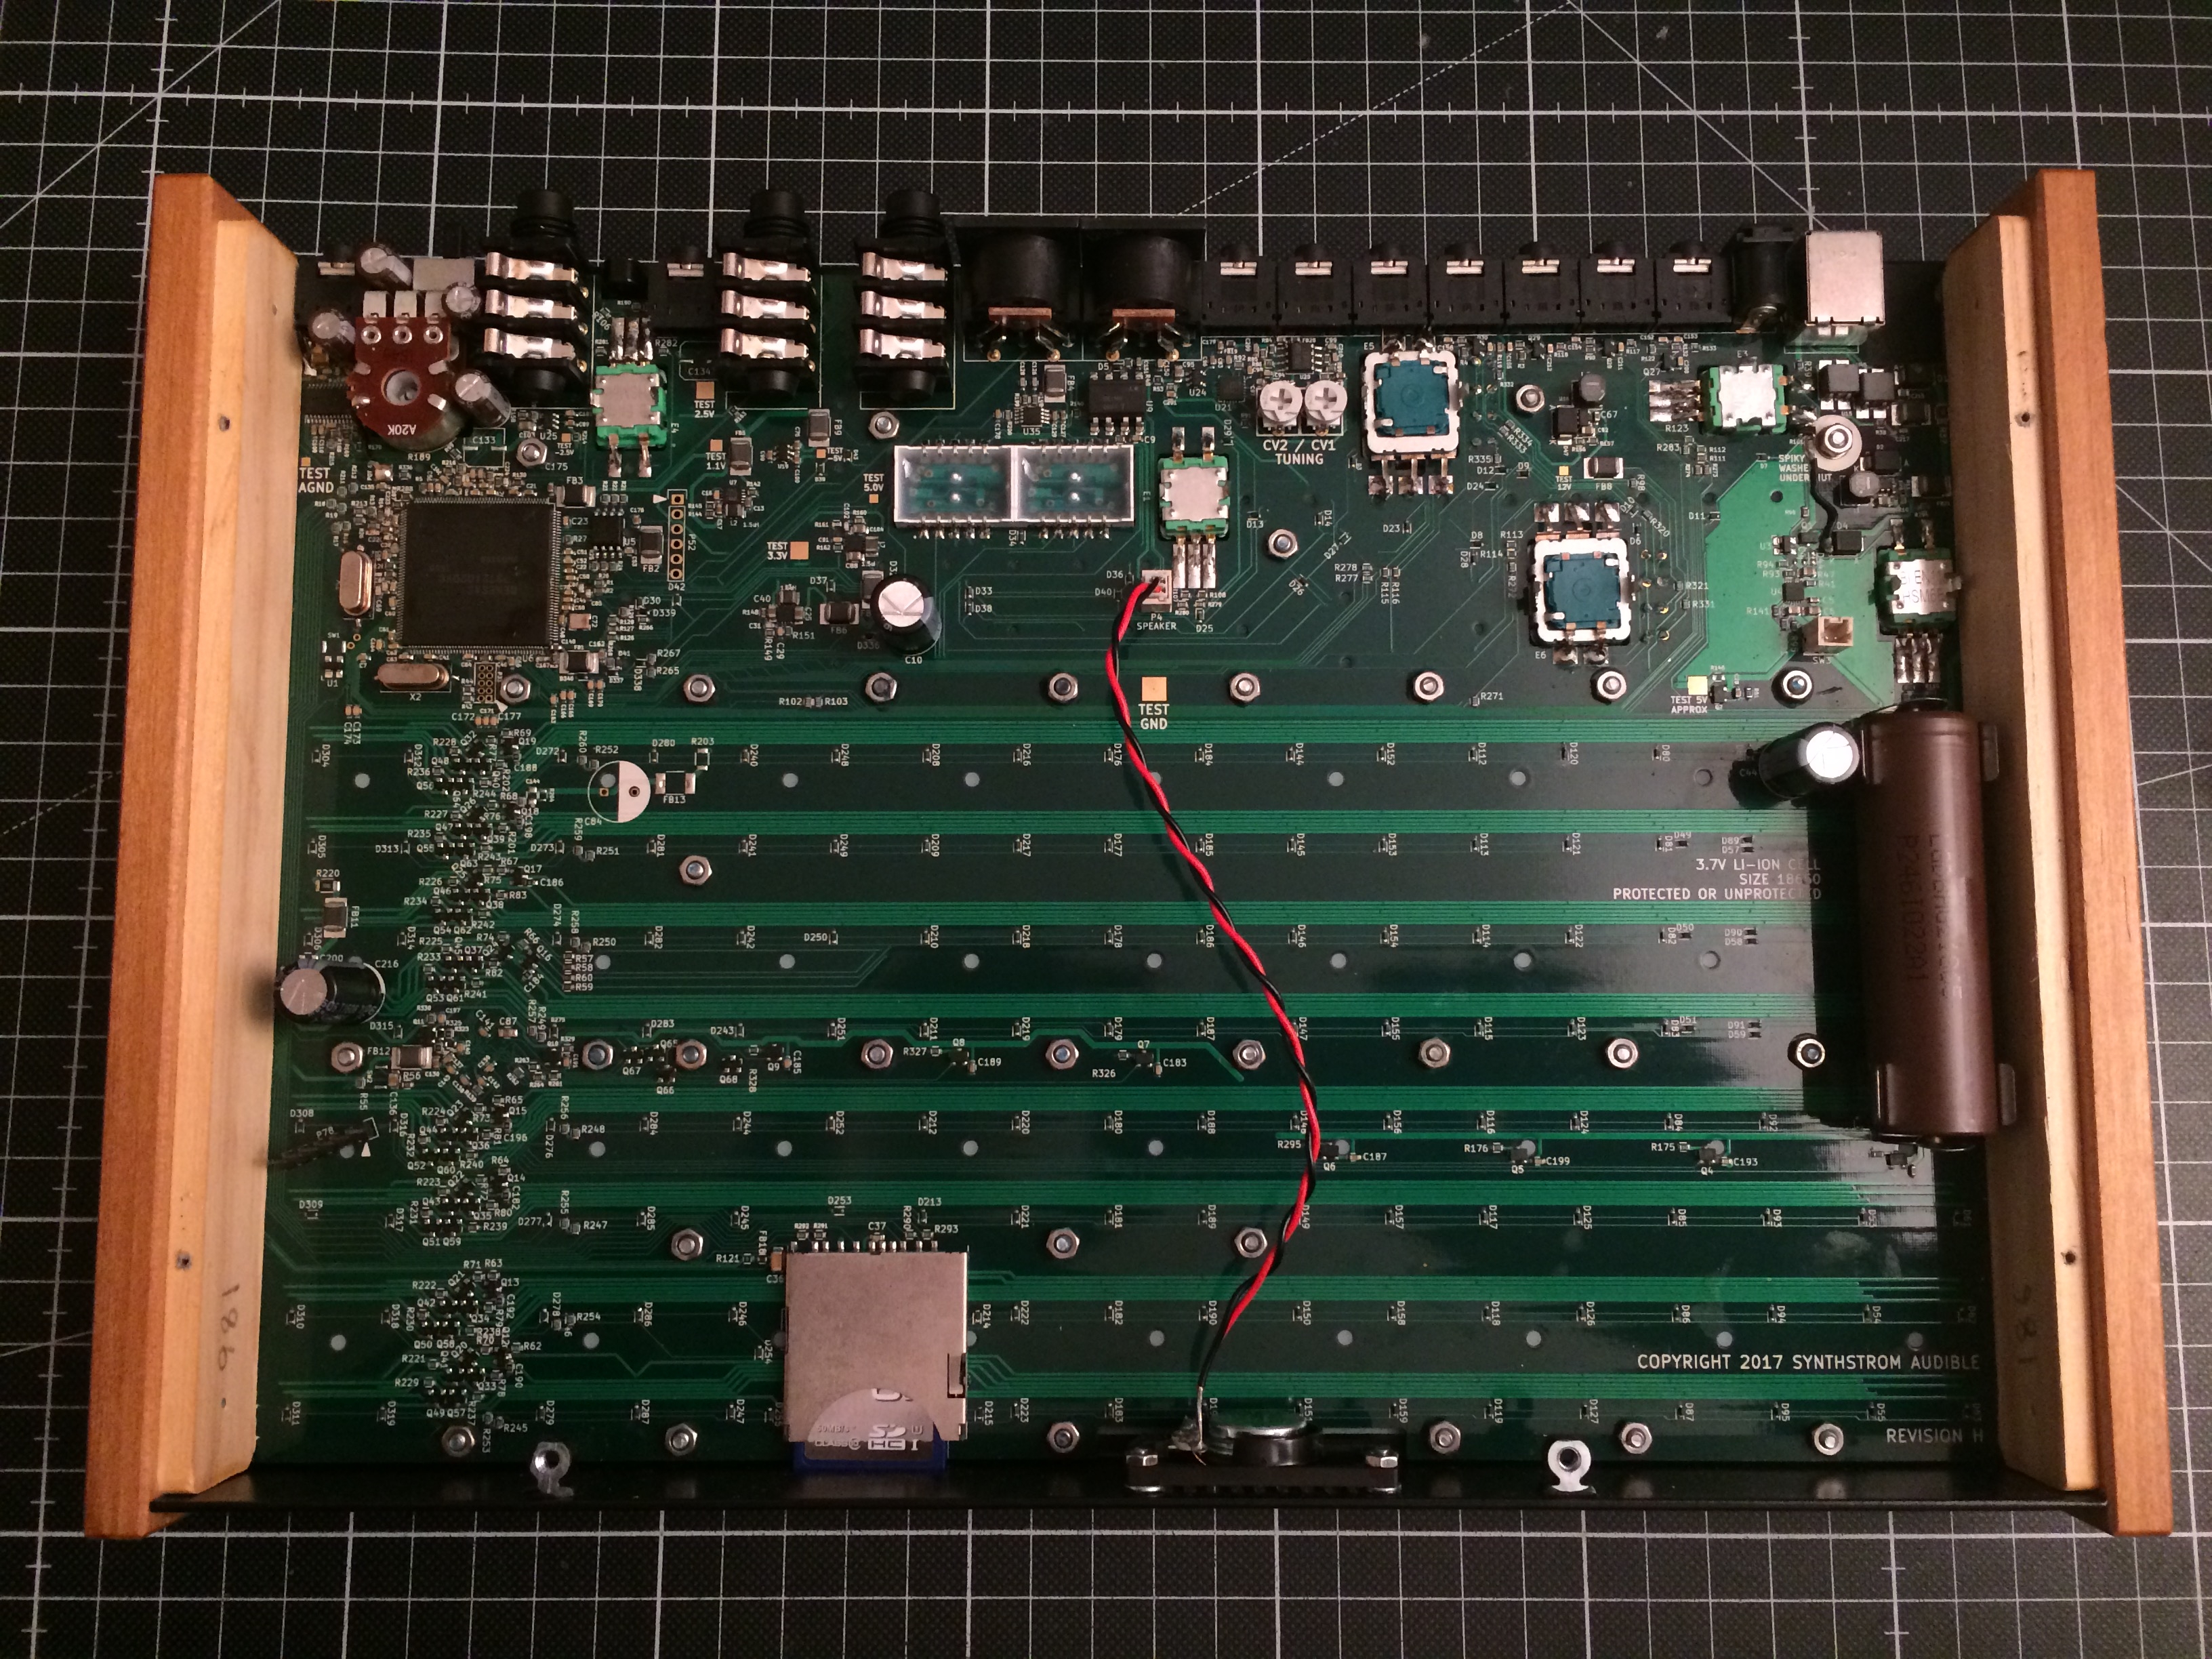
Into this free space I want to fit an RK 005, a USB Hub, and a Powerbank. All of those things will be held in place by 3D-printed mounts that will in turn be mounted to the deluge using Female-Female M2 Standoffs in place of some of the nuts you can see in the picture.
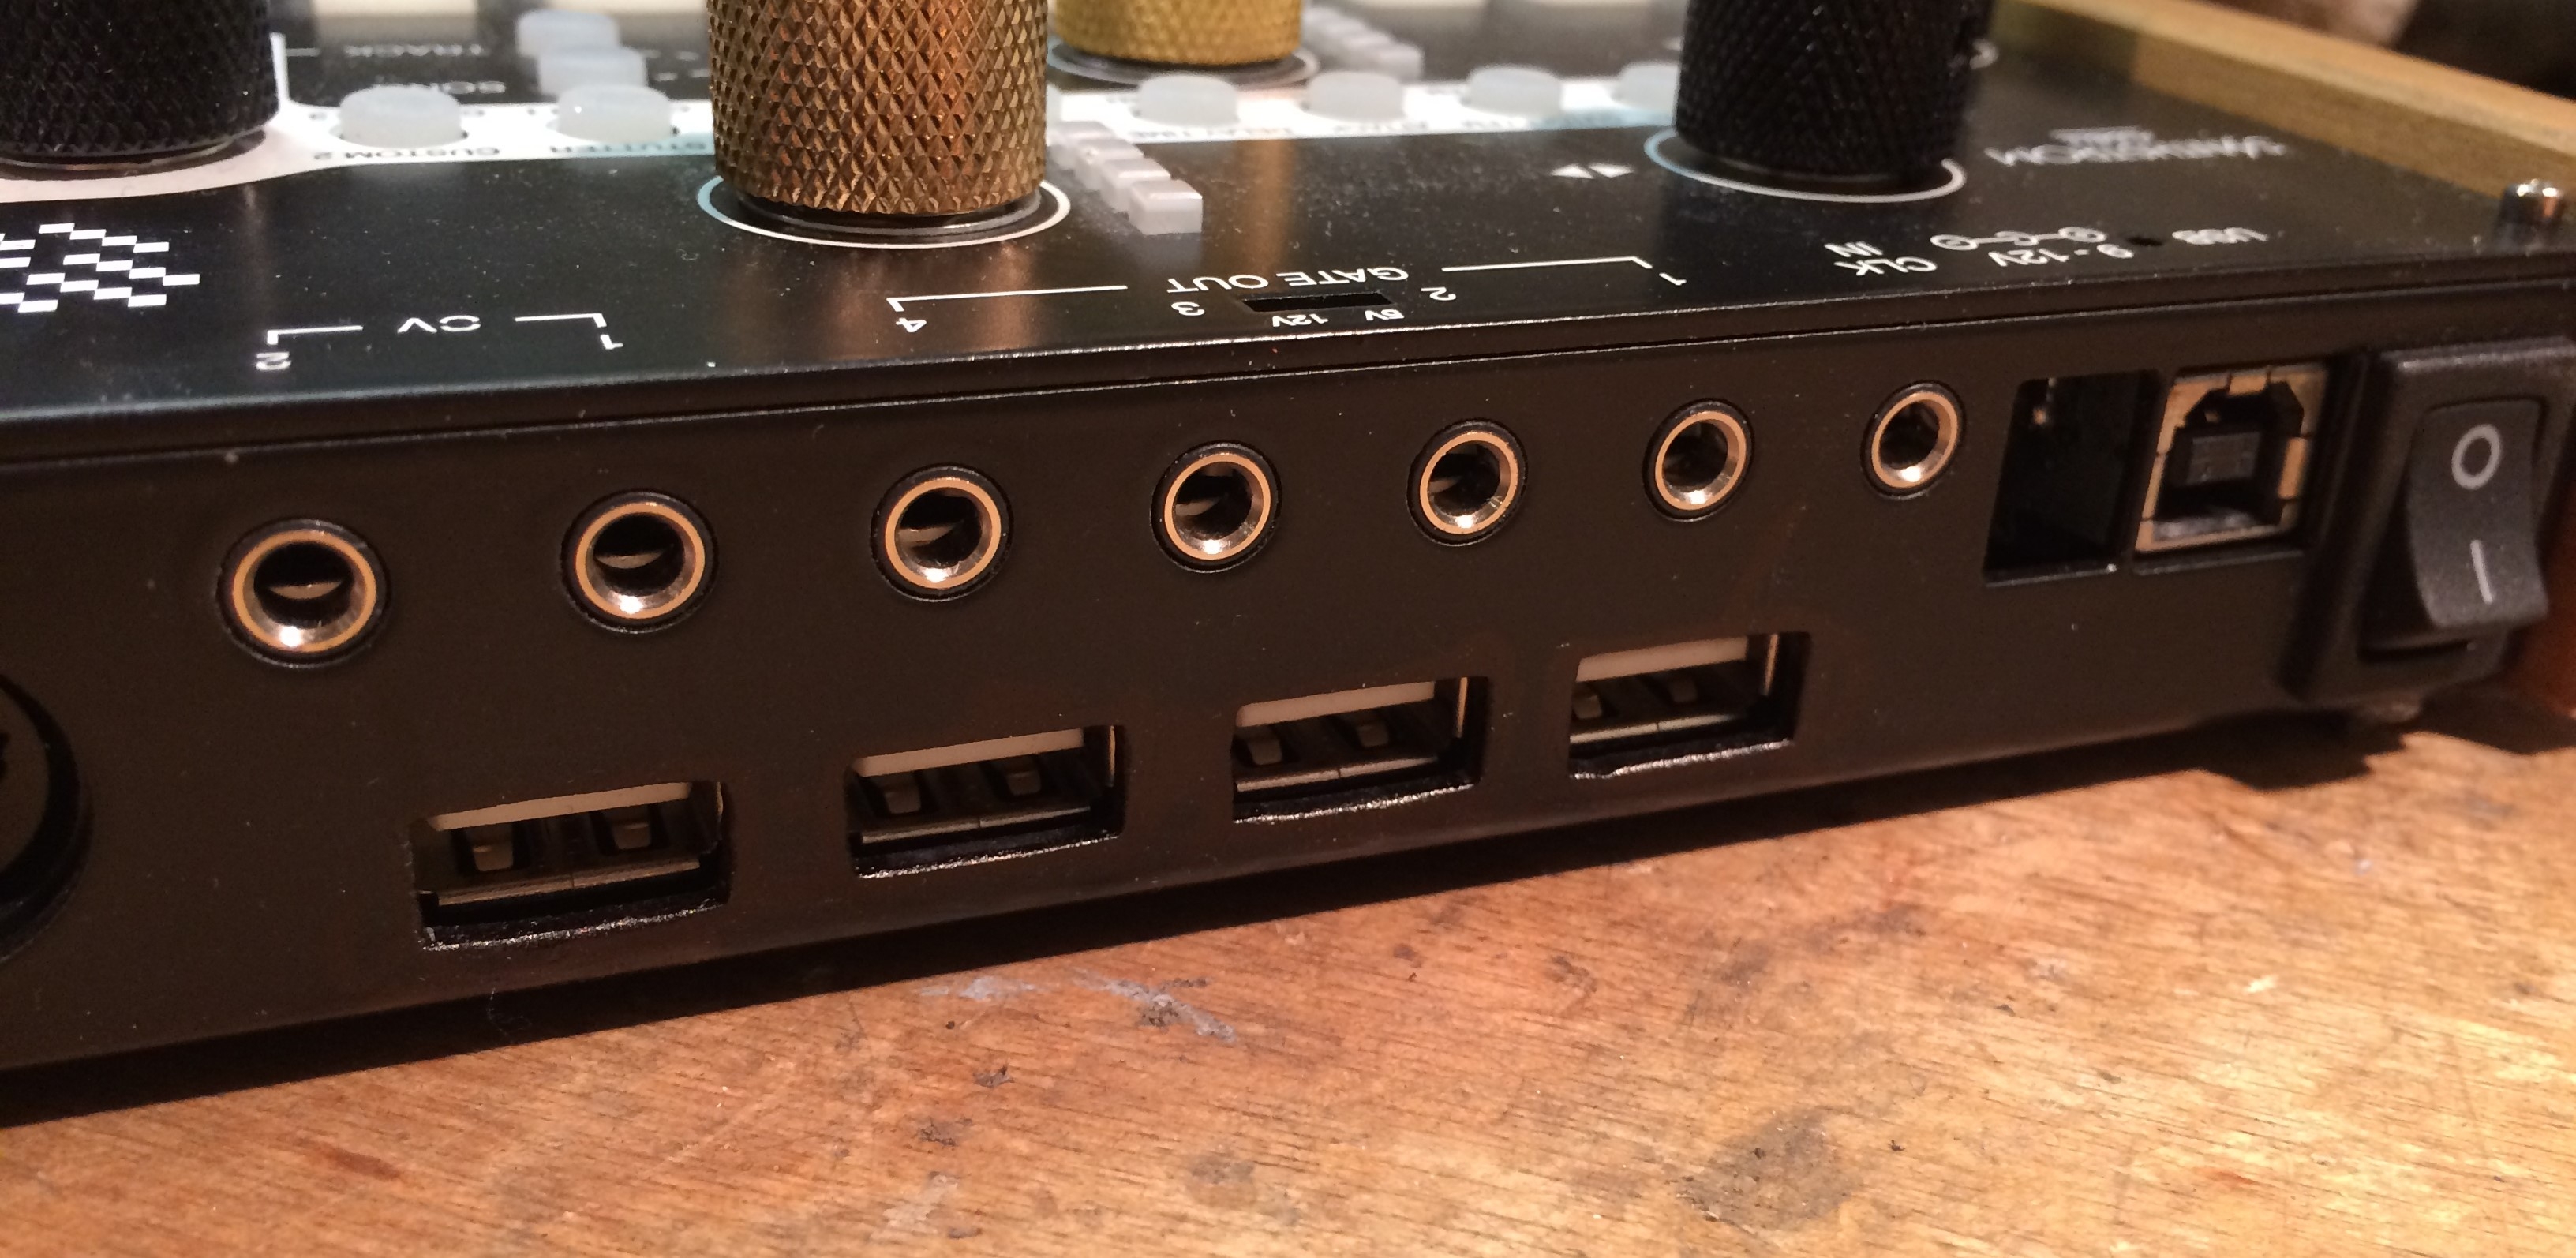
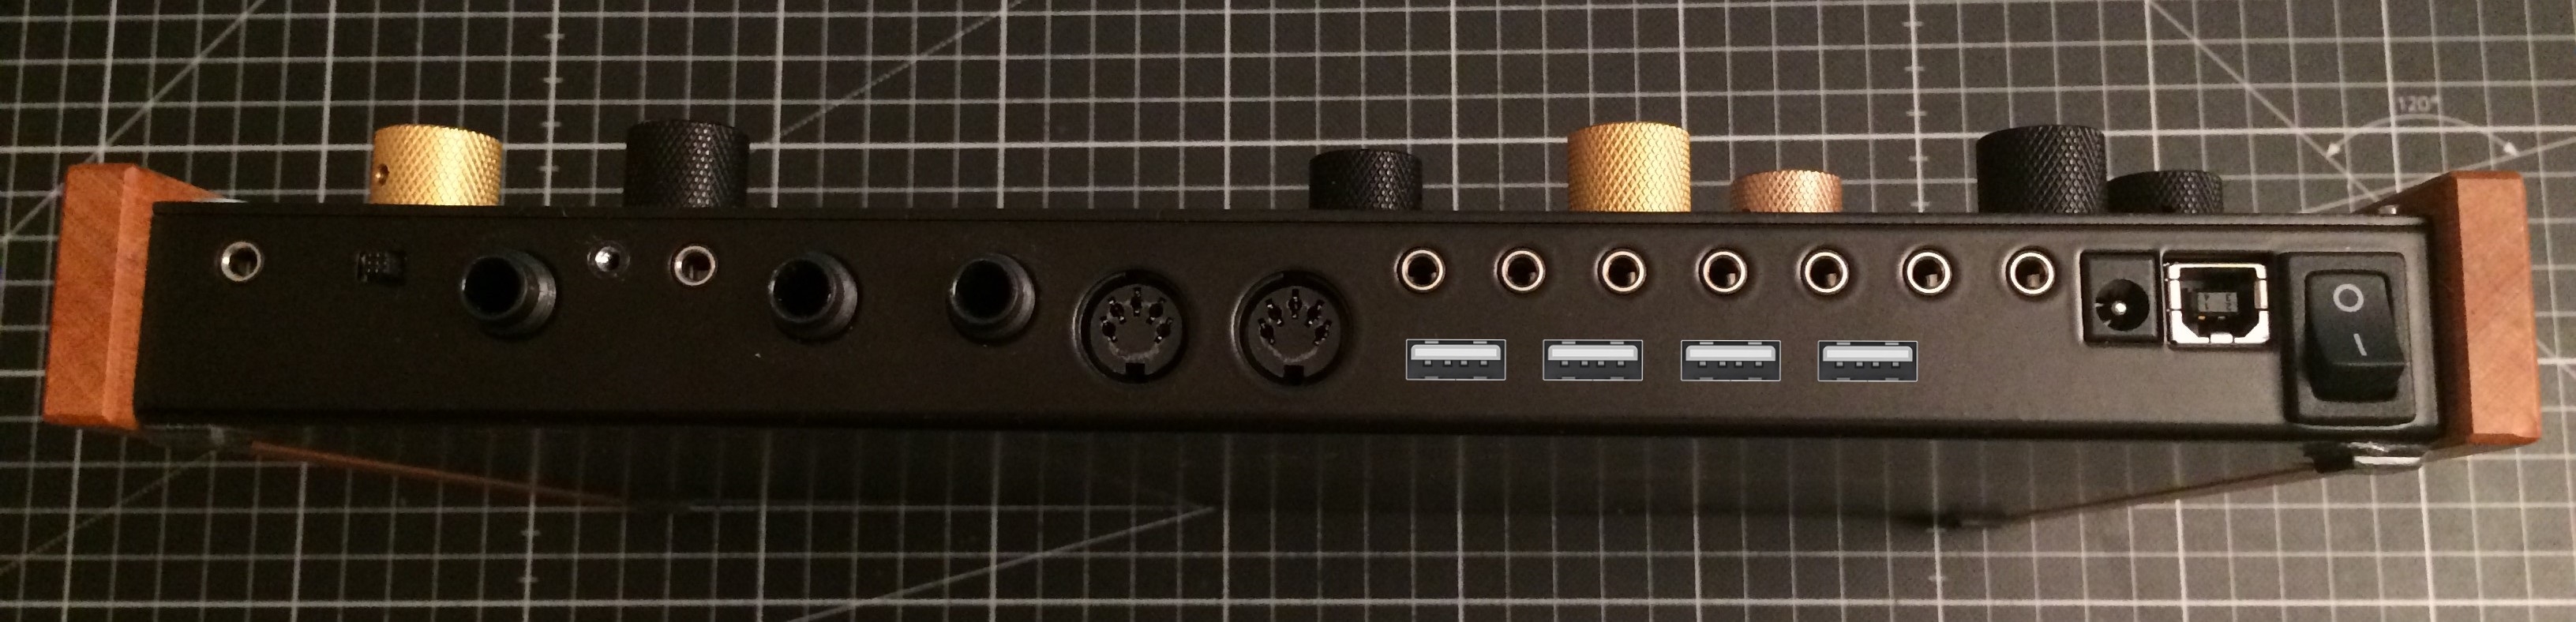
And here we have the rear connector area, as shown in the banner above. The 4 USB ports will be sitting underneath the CV/Gate outputs.
Components/Mods
Retrokits RK 005 is a Standalone USB MIDI Host and MIDI Interface. Any message it receives on an IN port will be echoed to all OUT ports, and if it's connected to a PC or other MIDI Host, will also be visible to that device. The cool thing, like a PC, it has full support for USB Hubs, so you can (in theory) connect up to 127 USB MIDI devices to it.
It also has a configurable TRS jack that can be configured to Gate, Clock or CV output and any combination of two of those, which I could put next to the USB ports.
And it has a status LED, which could be a useful thing to make visible as well.
To fit into the chassis of the Deluge, I will have to desolder the TRS jack and the DIN MIDI connectors. Luckily, as the Deluge has MIDI through between USB and DIN, I won't be needing those anyway.
A 7-port USB 2.0 Hub. The flat form factor is important, as is the number of ports. Four of them will face outside, one of the ones facing inward will be connected to the deluges USB port. Then I still got two left for further mods. I'm thinking a Raspberry Pi Zero to interface with Bluetooth MIDI gear, for example.
The case of this will be removed, of course.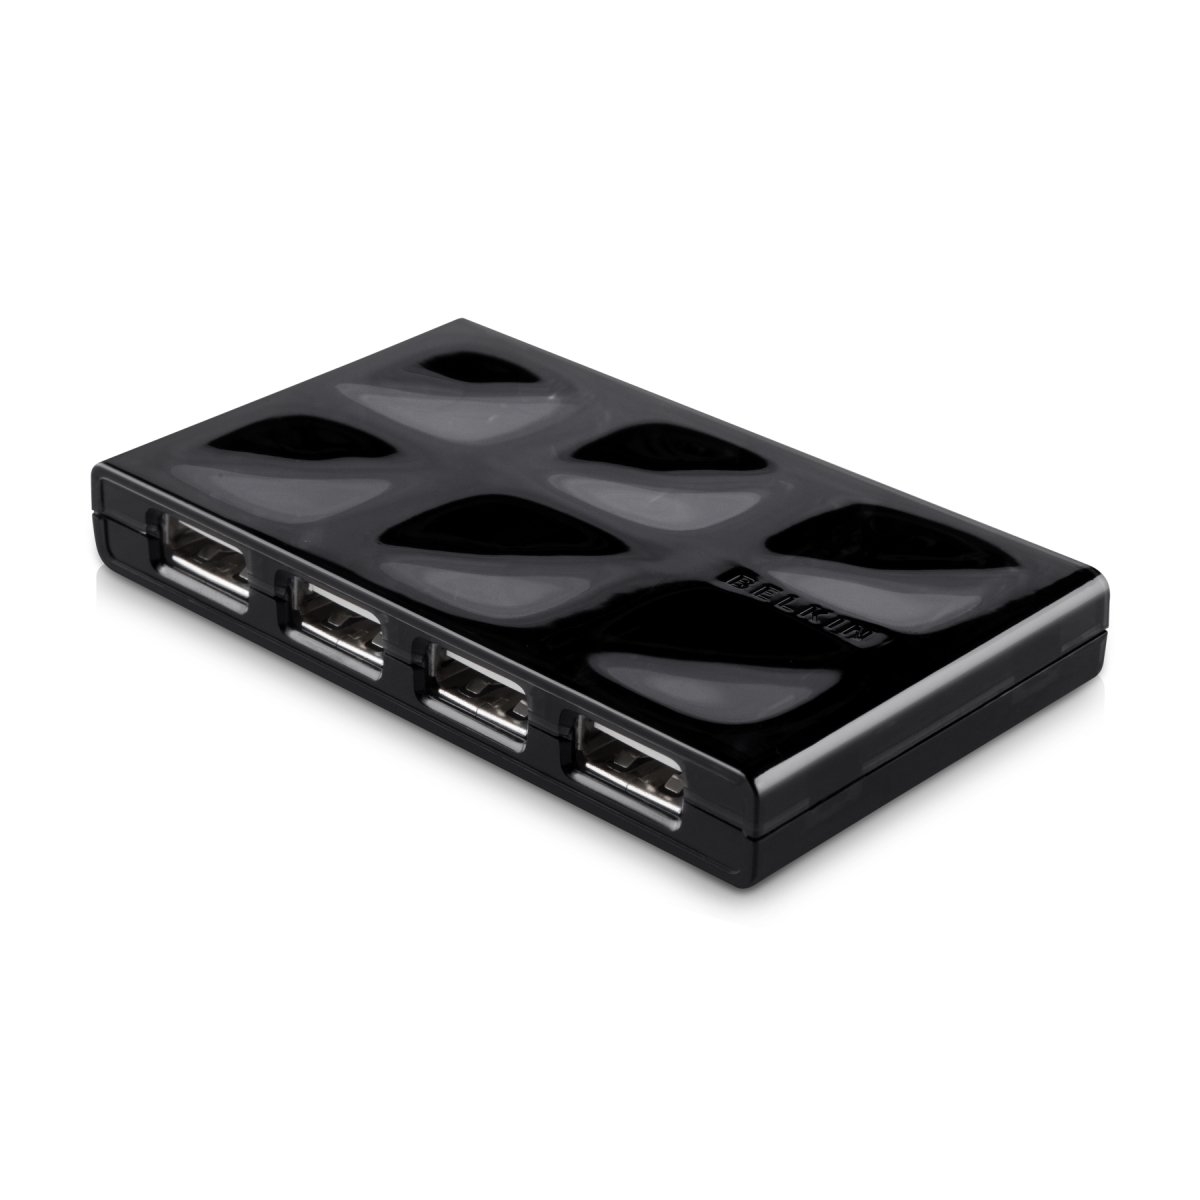
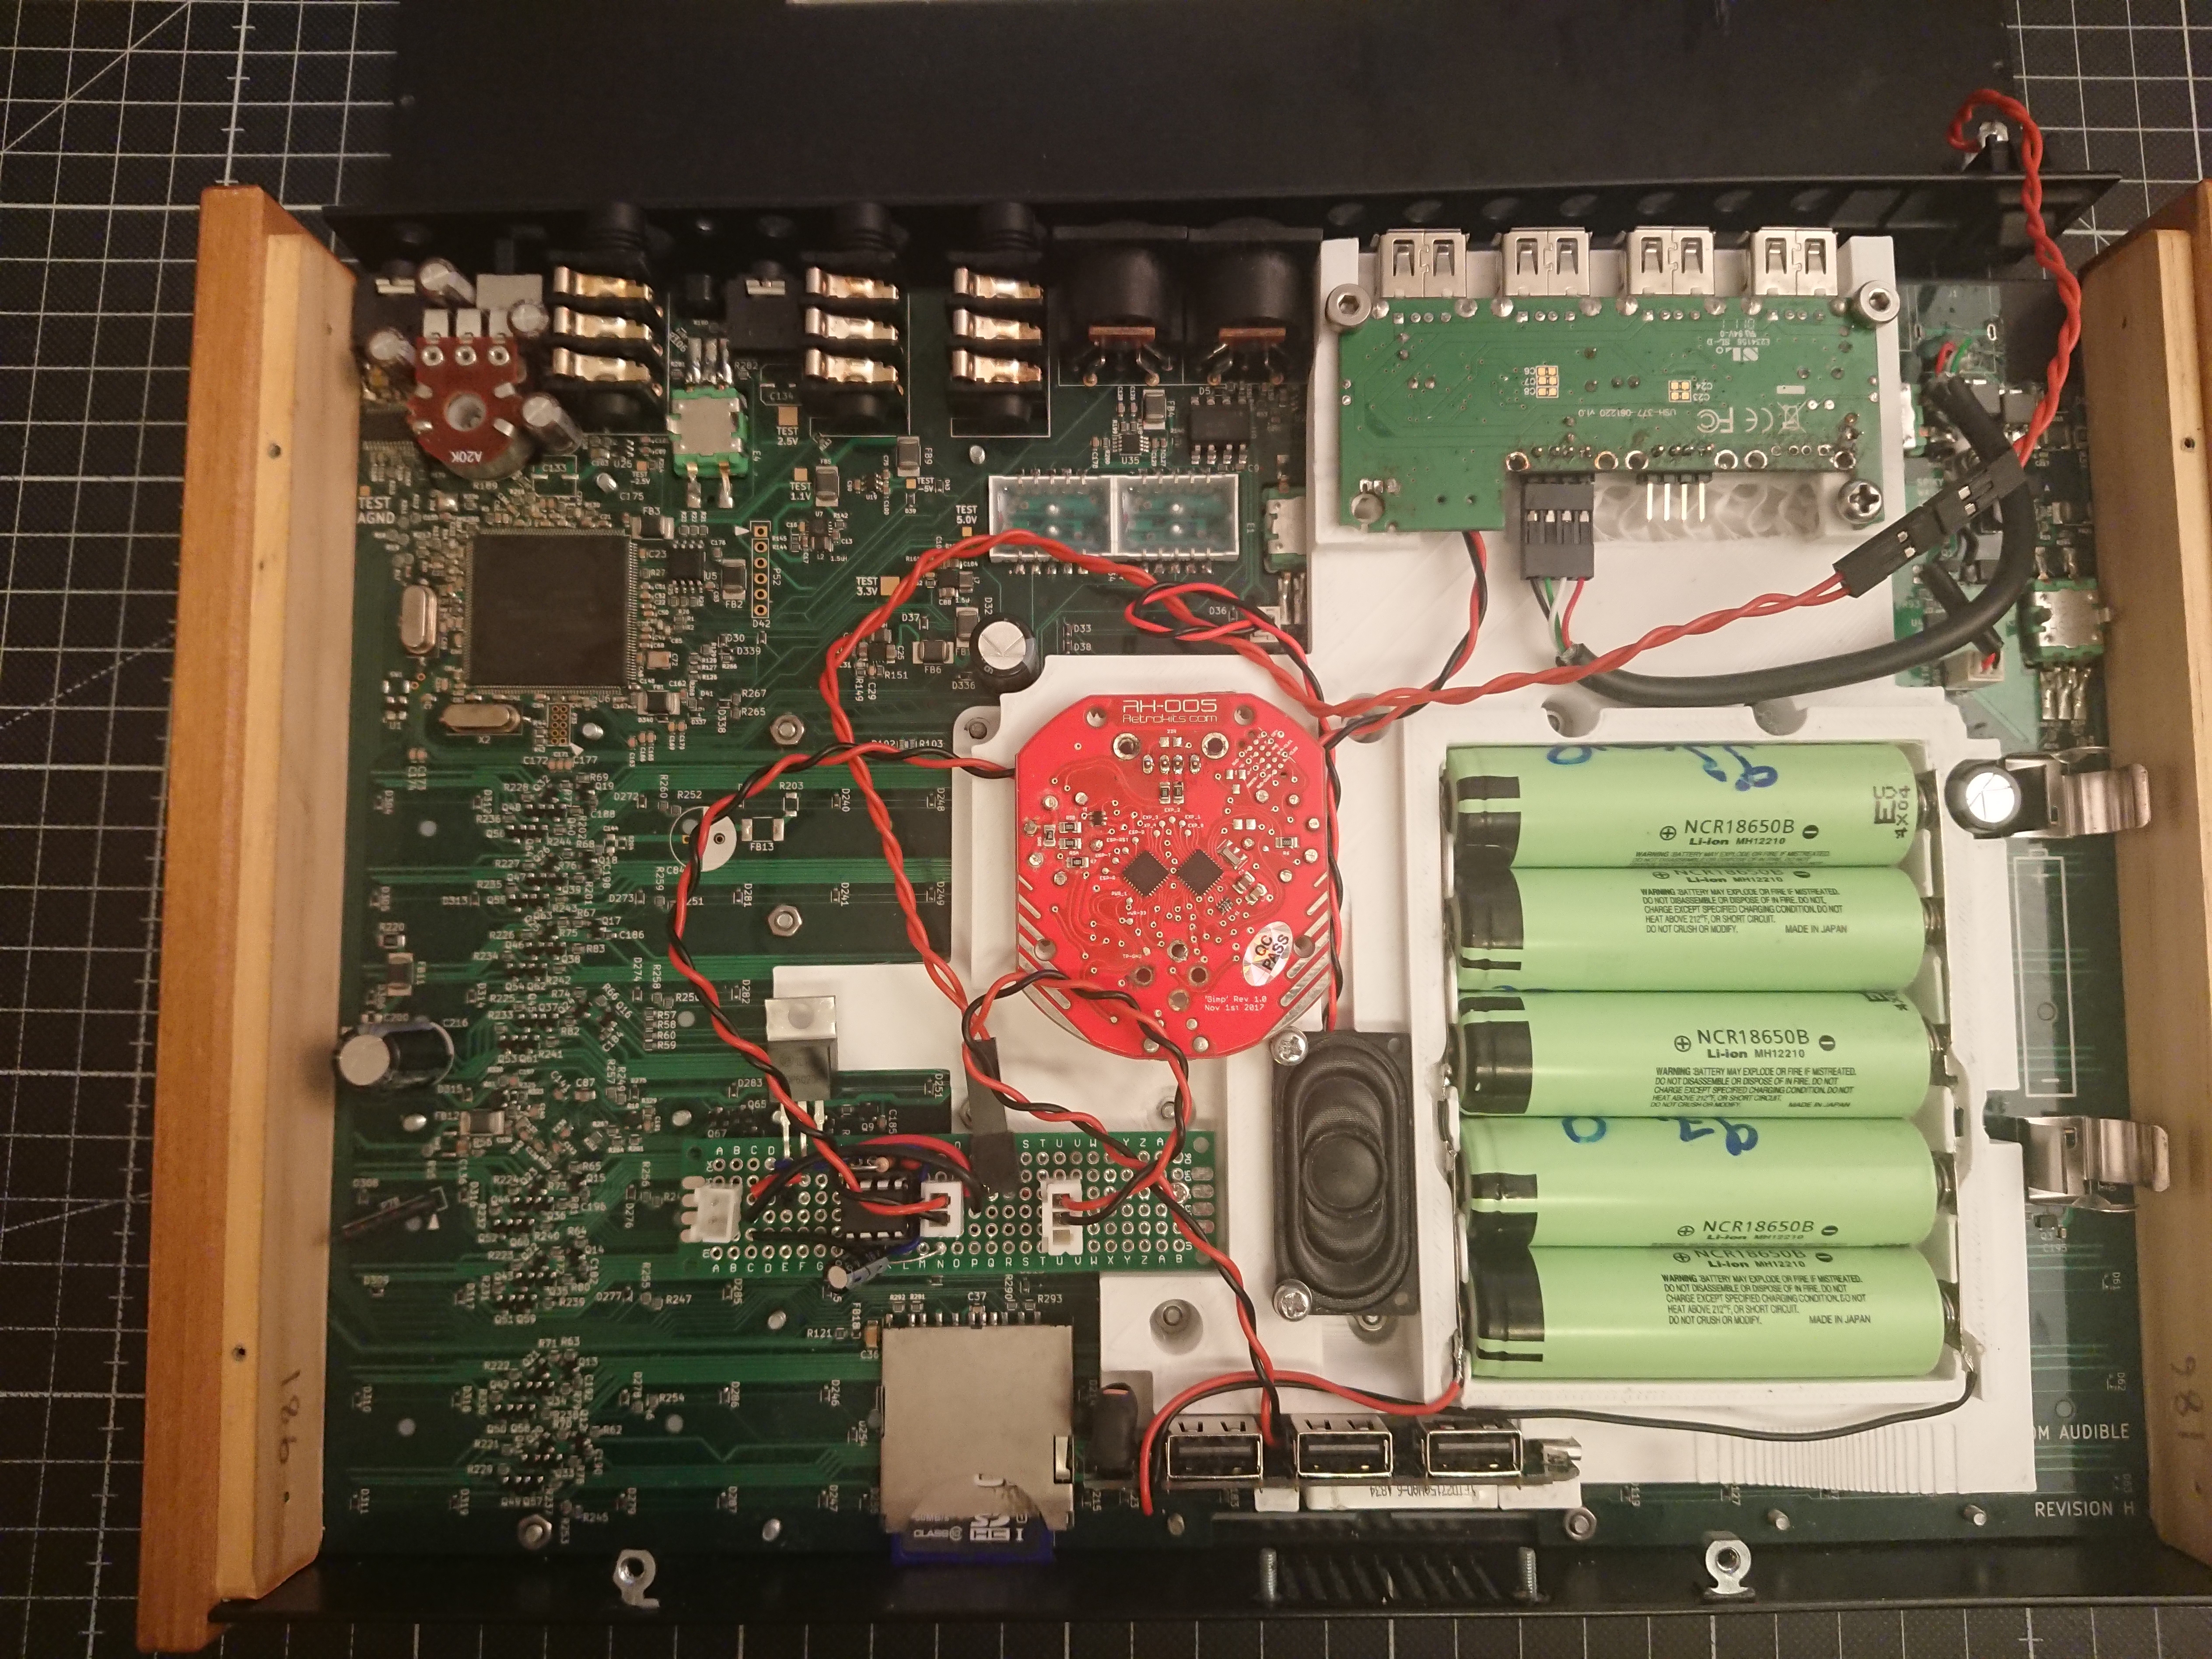
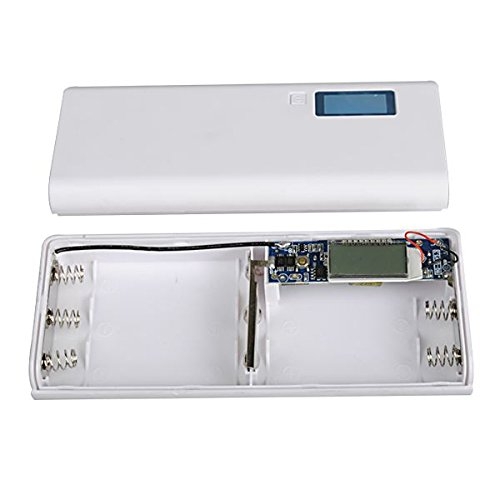
A 5x18650 powerbank kit (similar to what's shown in the picture). The case I don't care about, I only need the circuit. This will be connected to five 18650 batteries, the single one in the Deluge right now will be removed.
I'll probably solder the USB connections, plugging in cables in there feels to error-prone and unreliable.
If I want to make the battery indicator visisble, I'll have to desolder it as well.Sidenote: I will not re-use the 18650 cell of the deluge. I'm getting five new ones from the same batch that will be matched by their inner resistance. This is important for the parallel charging and discharging to work properly.
The Deluge itself will also have to be modified. First of, the battery goes out. The battery holder and capacitor will be left in place unless I run out of space. The 9V input will be desoldered, as well as the USB B connector. In the place of the latter, I'll solder a cable connected to the hub, as shown below. If I'm lucky I can just re-use the USB connector by turning it upside down, that would be pretty smooth. The SW3 header (the one the power switch connects to) will be bridged so the Deluge turns on or off as the powerbank provides power or not. The power switch itself I'm not sure about. Whether I can reuse this depends on how the powerbank behaves exactly. And, of course, I will have to cut holes into the rear/bottom plate to expose the USB connectors.
For some additional indicators, like the MIDI and Battery LEDs, I could use the speaker grill. If I do that, I'll have to reseat the speaker and work out how to redirect the sound towards the grill again.System Design
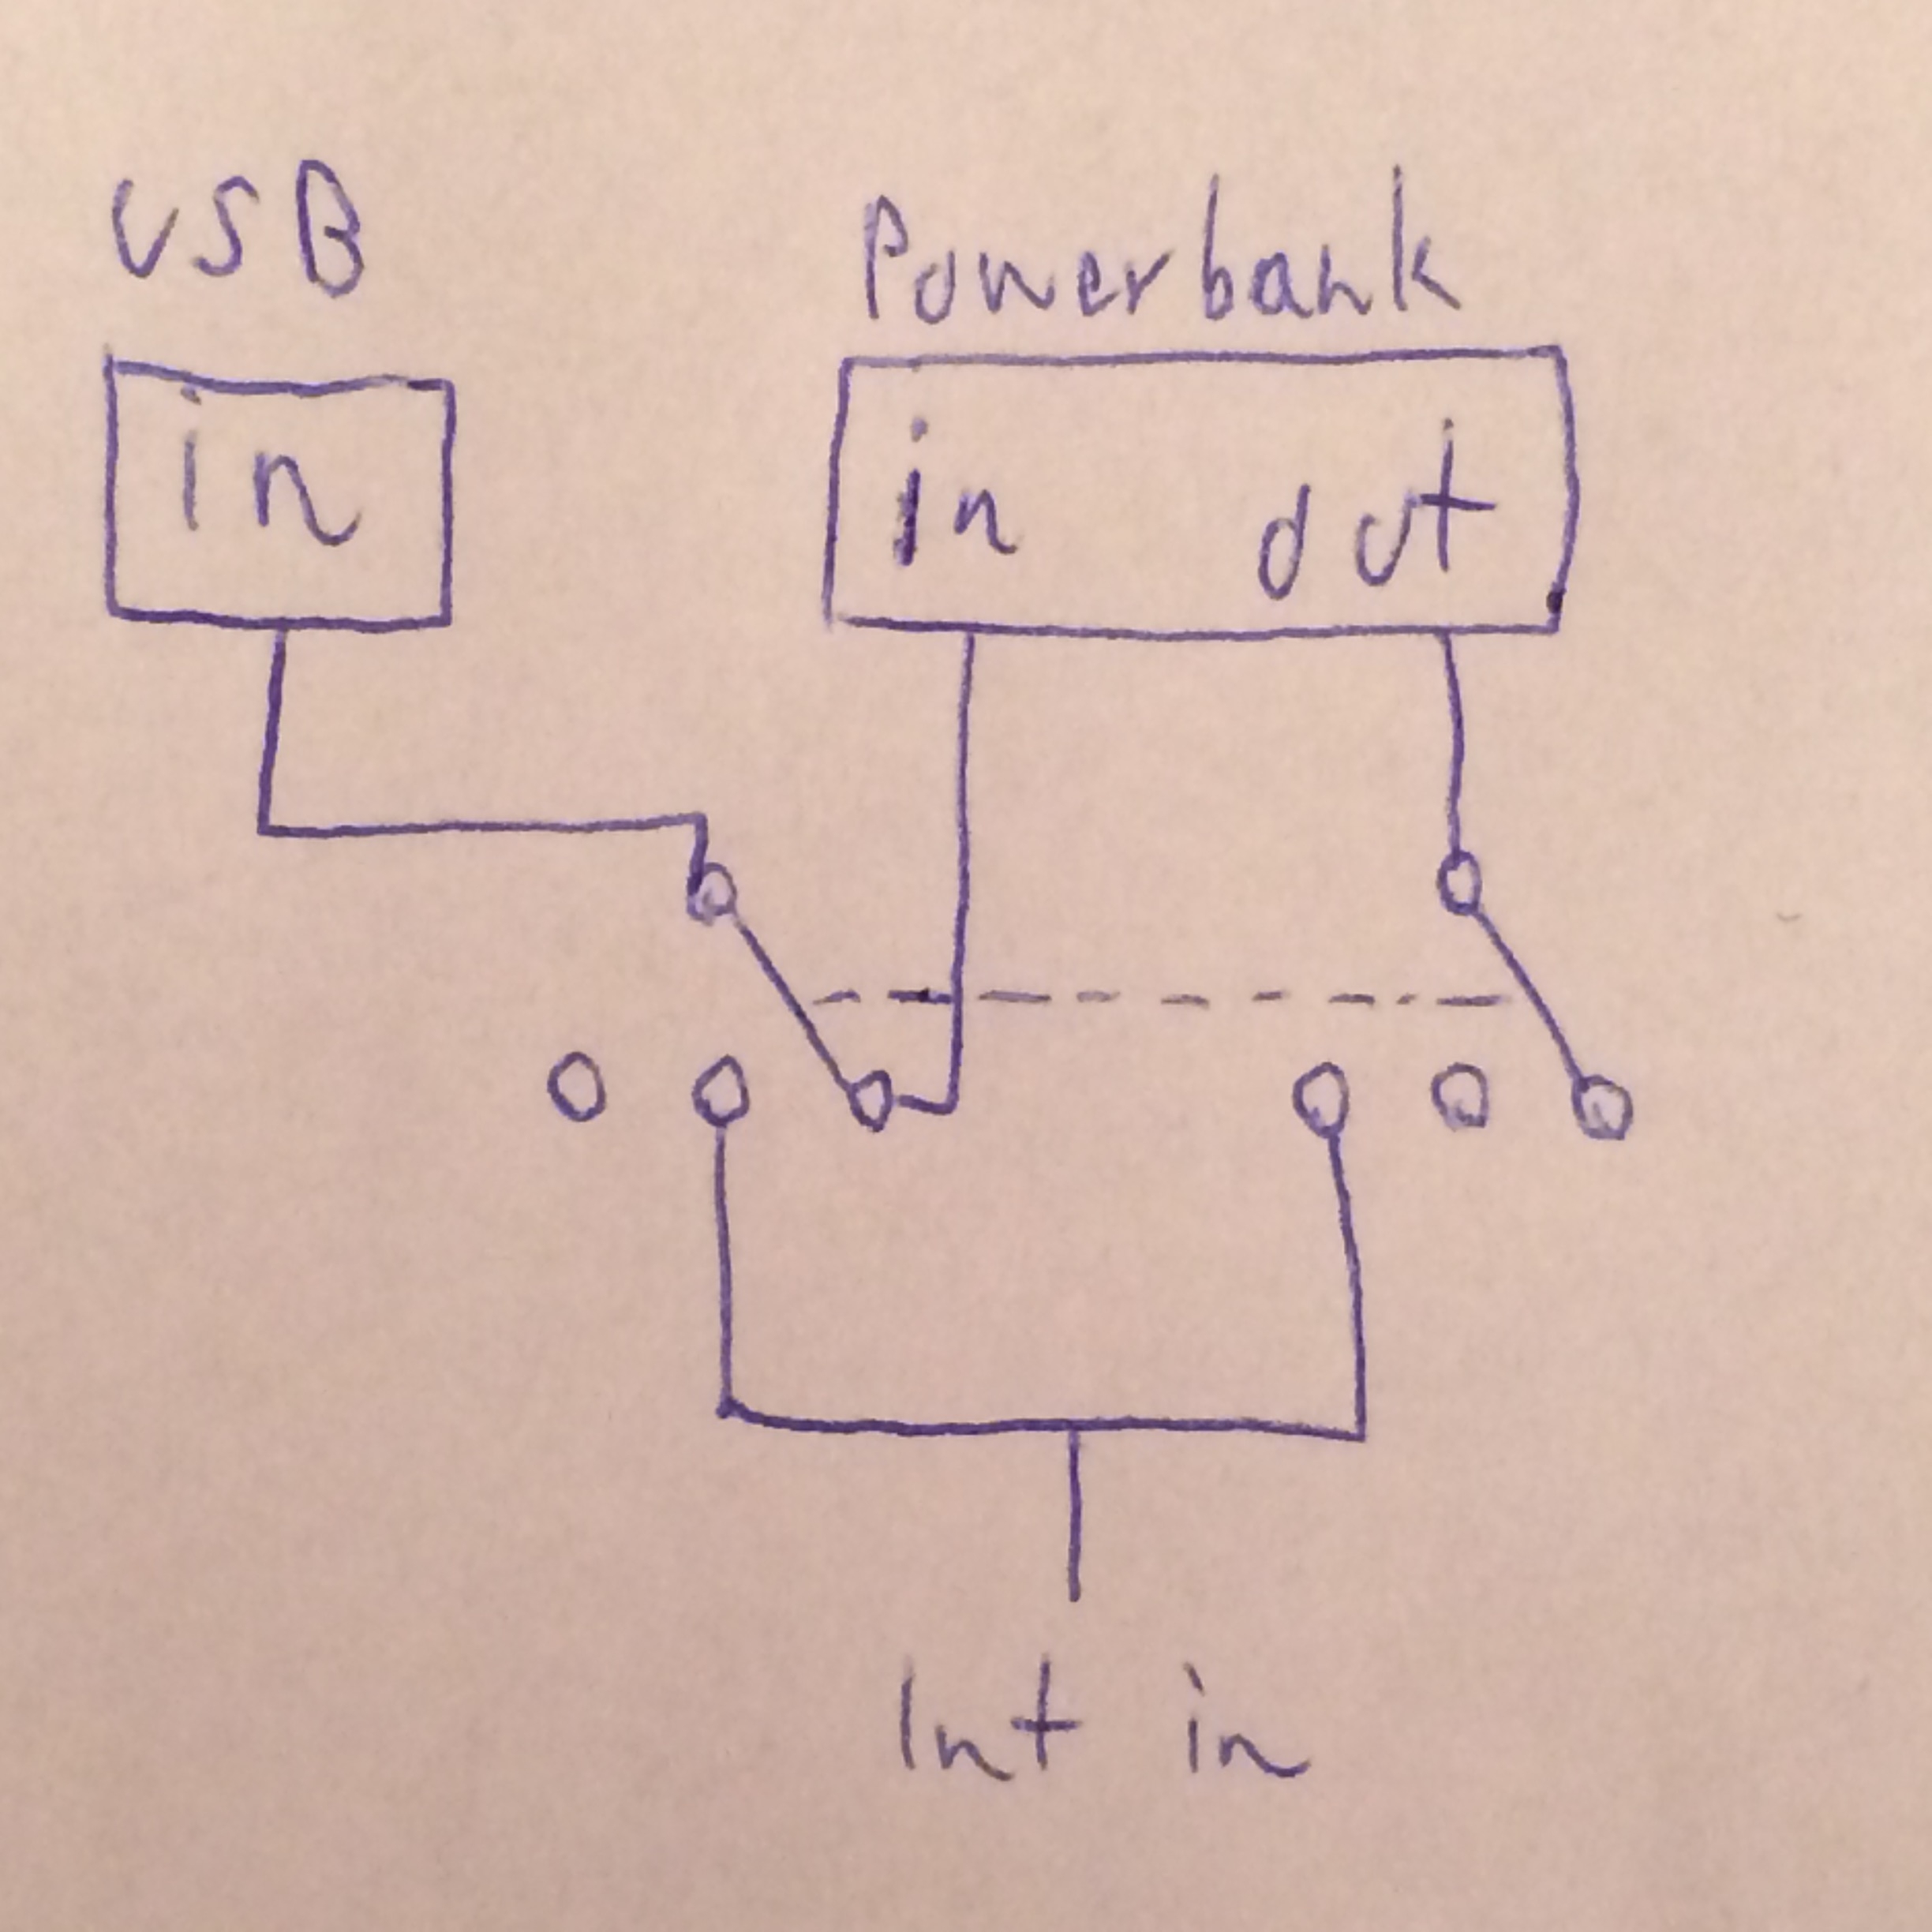
Here's the plan I threw together in paint.net (for the pedantic: Arrow direction represents logical USB downstream direction)

Really quite simple. The Powerbank has to be bypassed as powerbanks normally don't forward incoming data; instead, they connect the pins using a combination of resistors to communicate to the device being charged how much current it can pull.
And the RK 005 is bypassed for power to give more headroom for connected devicesThe Beginning
Thanks for reading, hope you'll follow me on this journey. Maybe you have some ideas/tips as well? Feel free to share any thoughts!
-
Deluge MIDI Host Mod Buildlog
Updates left and right
All components are here now!
In addition to the RK 005 and all the powerbank stuff we've also got the RasPi Zero W (the W is for wireless, which means it has WiFi and Bluetooth onboard, which the original Zero didn't), and the USB Hub!
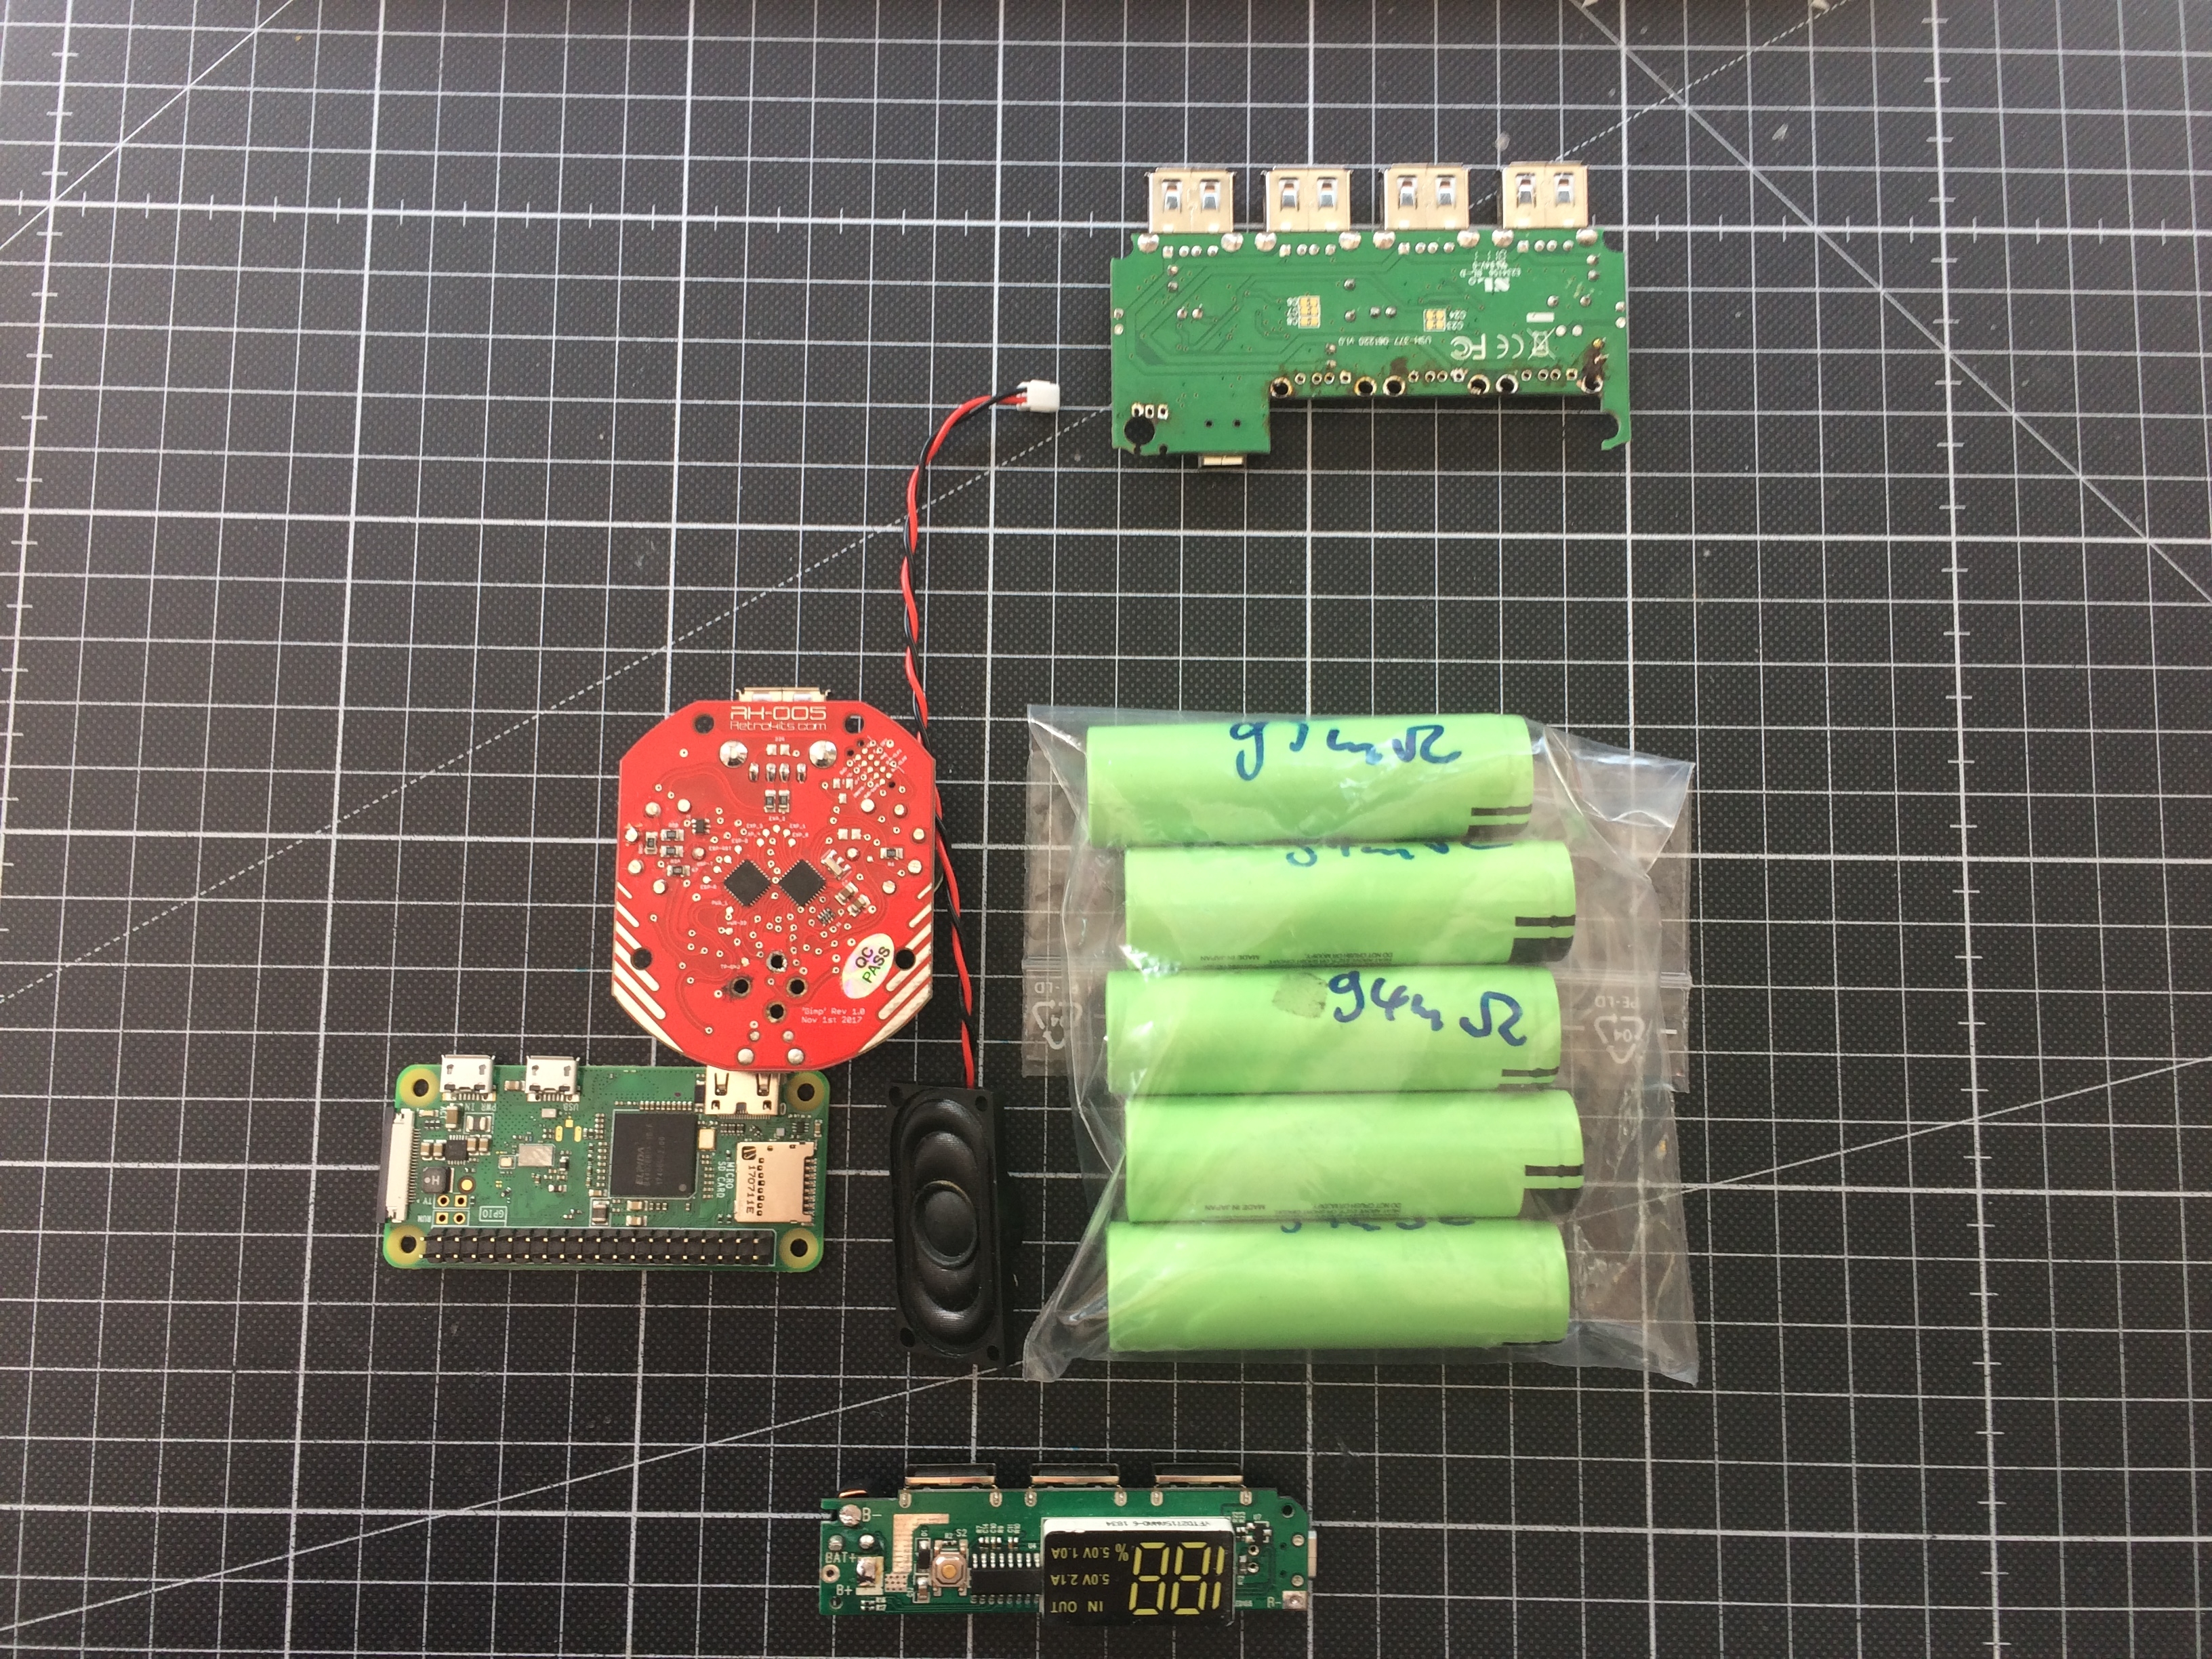
The hub
You can see that I already desoldered the internal downstream connectors of the hub and the power adapter jack.
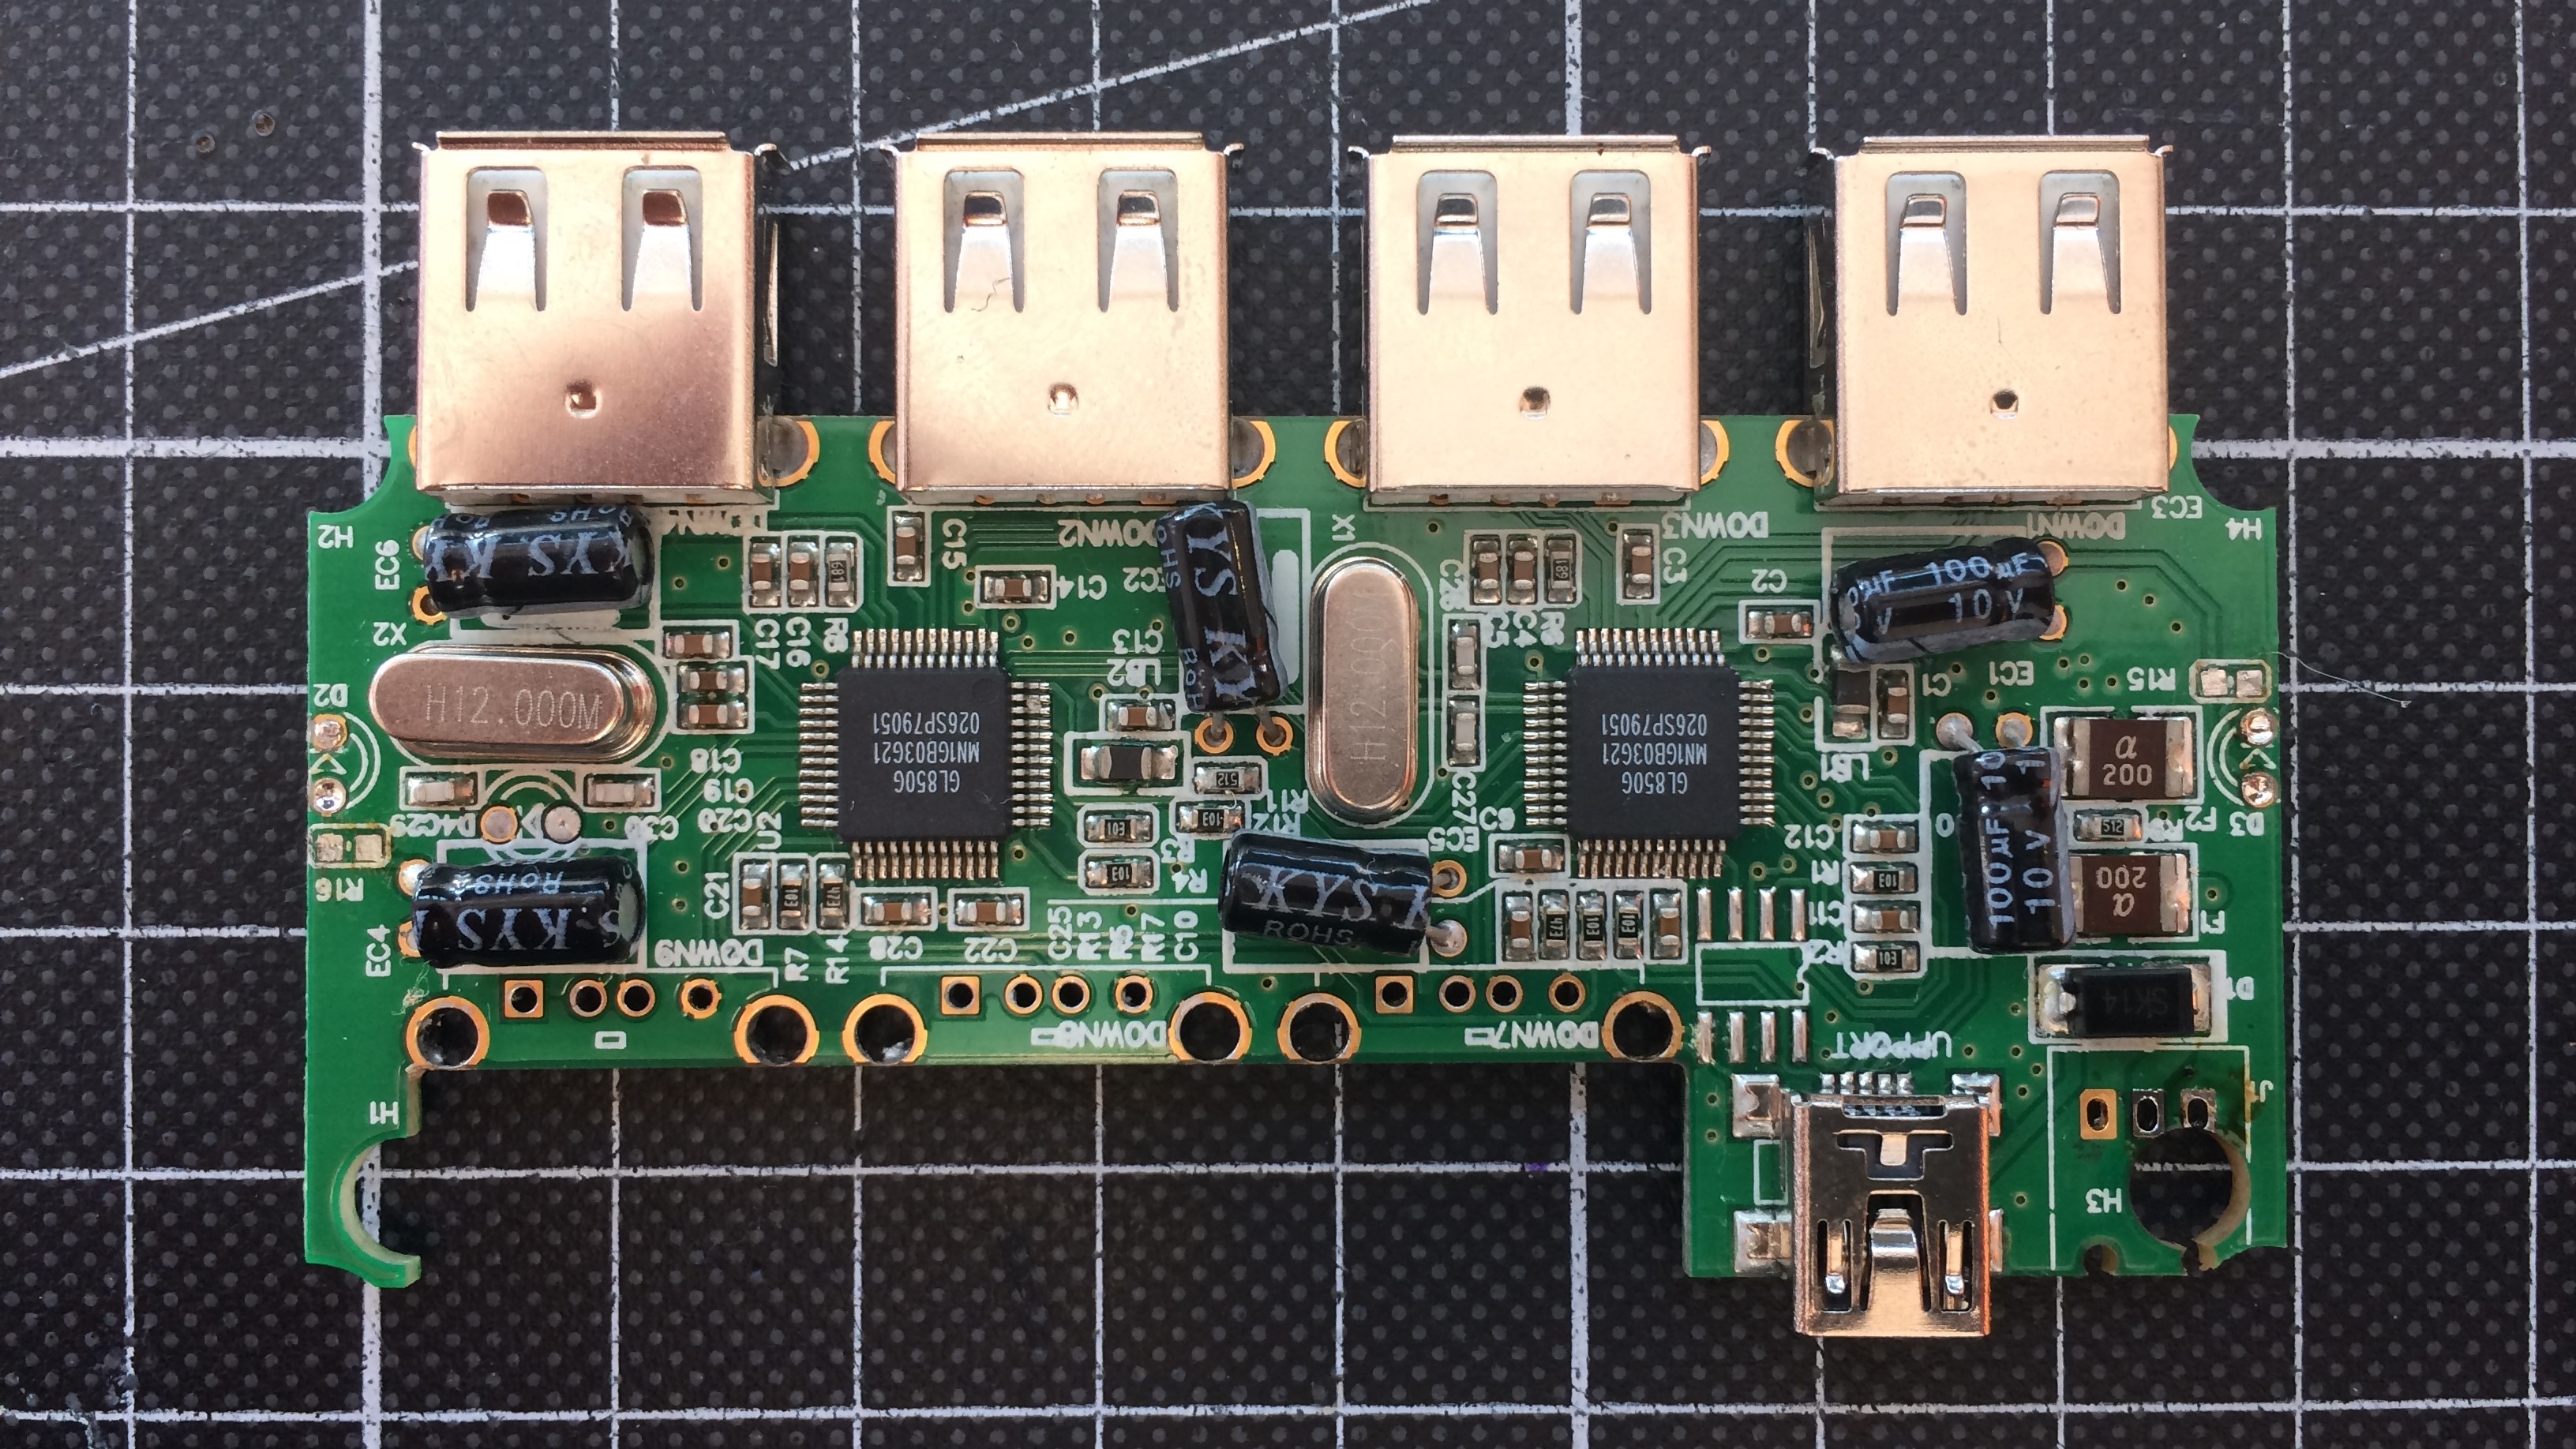
I also had to remove two resistors from the hub to get a larger surface area when mounting them. The resistors were only used for debugging LEDs (which are not installed), so they served no purpose and the hub works fine without them.
Now comes the cool part. As I found out, the power adapter jack handles 5V perfectly fine, and it supplies all output ports with power directly (after some bypass caps and protection diodes). So I can connect the output of the power bank directly to the hub and use the maximum current it can provide.
Previously I thought I'd have to supply all internal devices directly from the powerbank to not overload the hub, but that seems to be no problem now. This means cabling will be simpler and less soldering will be required.
The main structure
Now the most important bit: In the last two days, I modelled the main structure that everything is mounted on. This is what it looks like on screen:
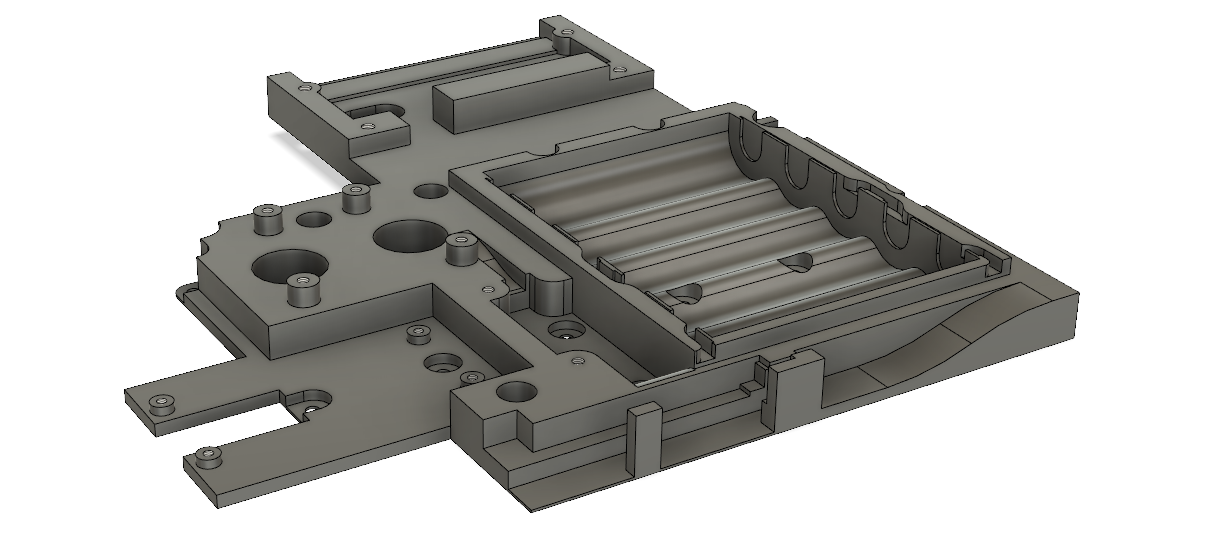
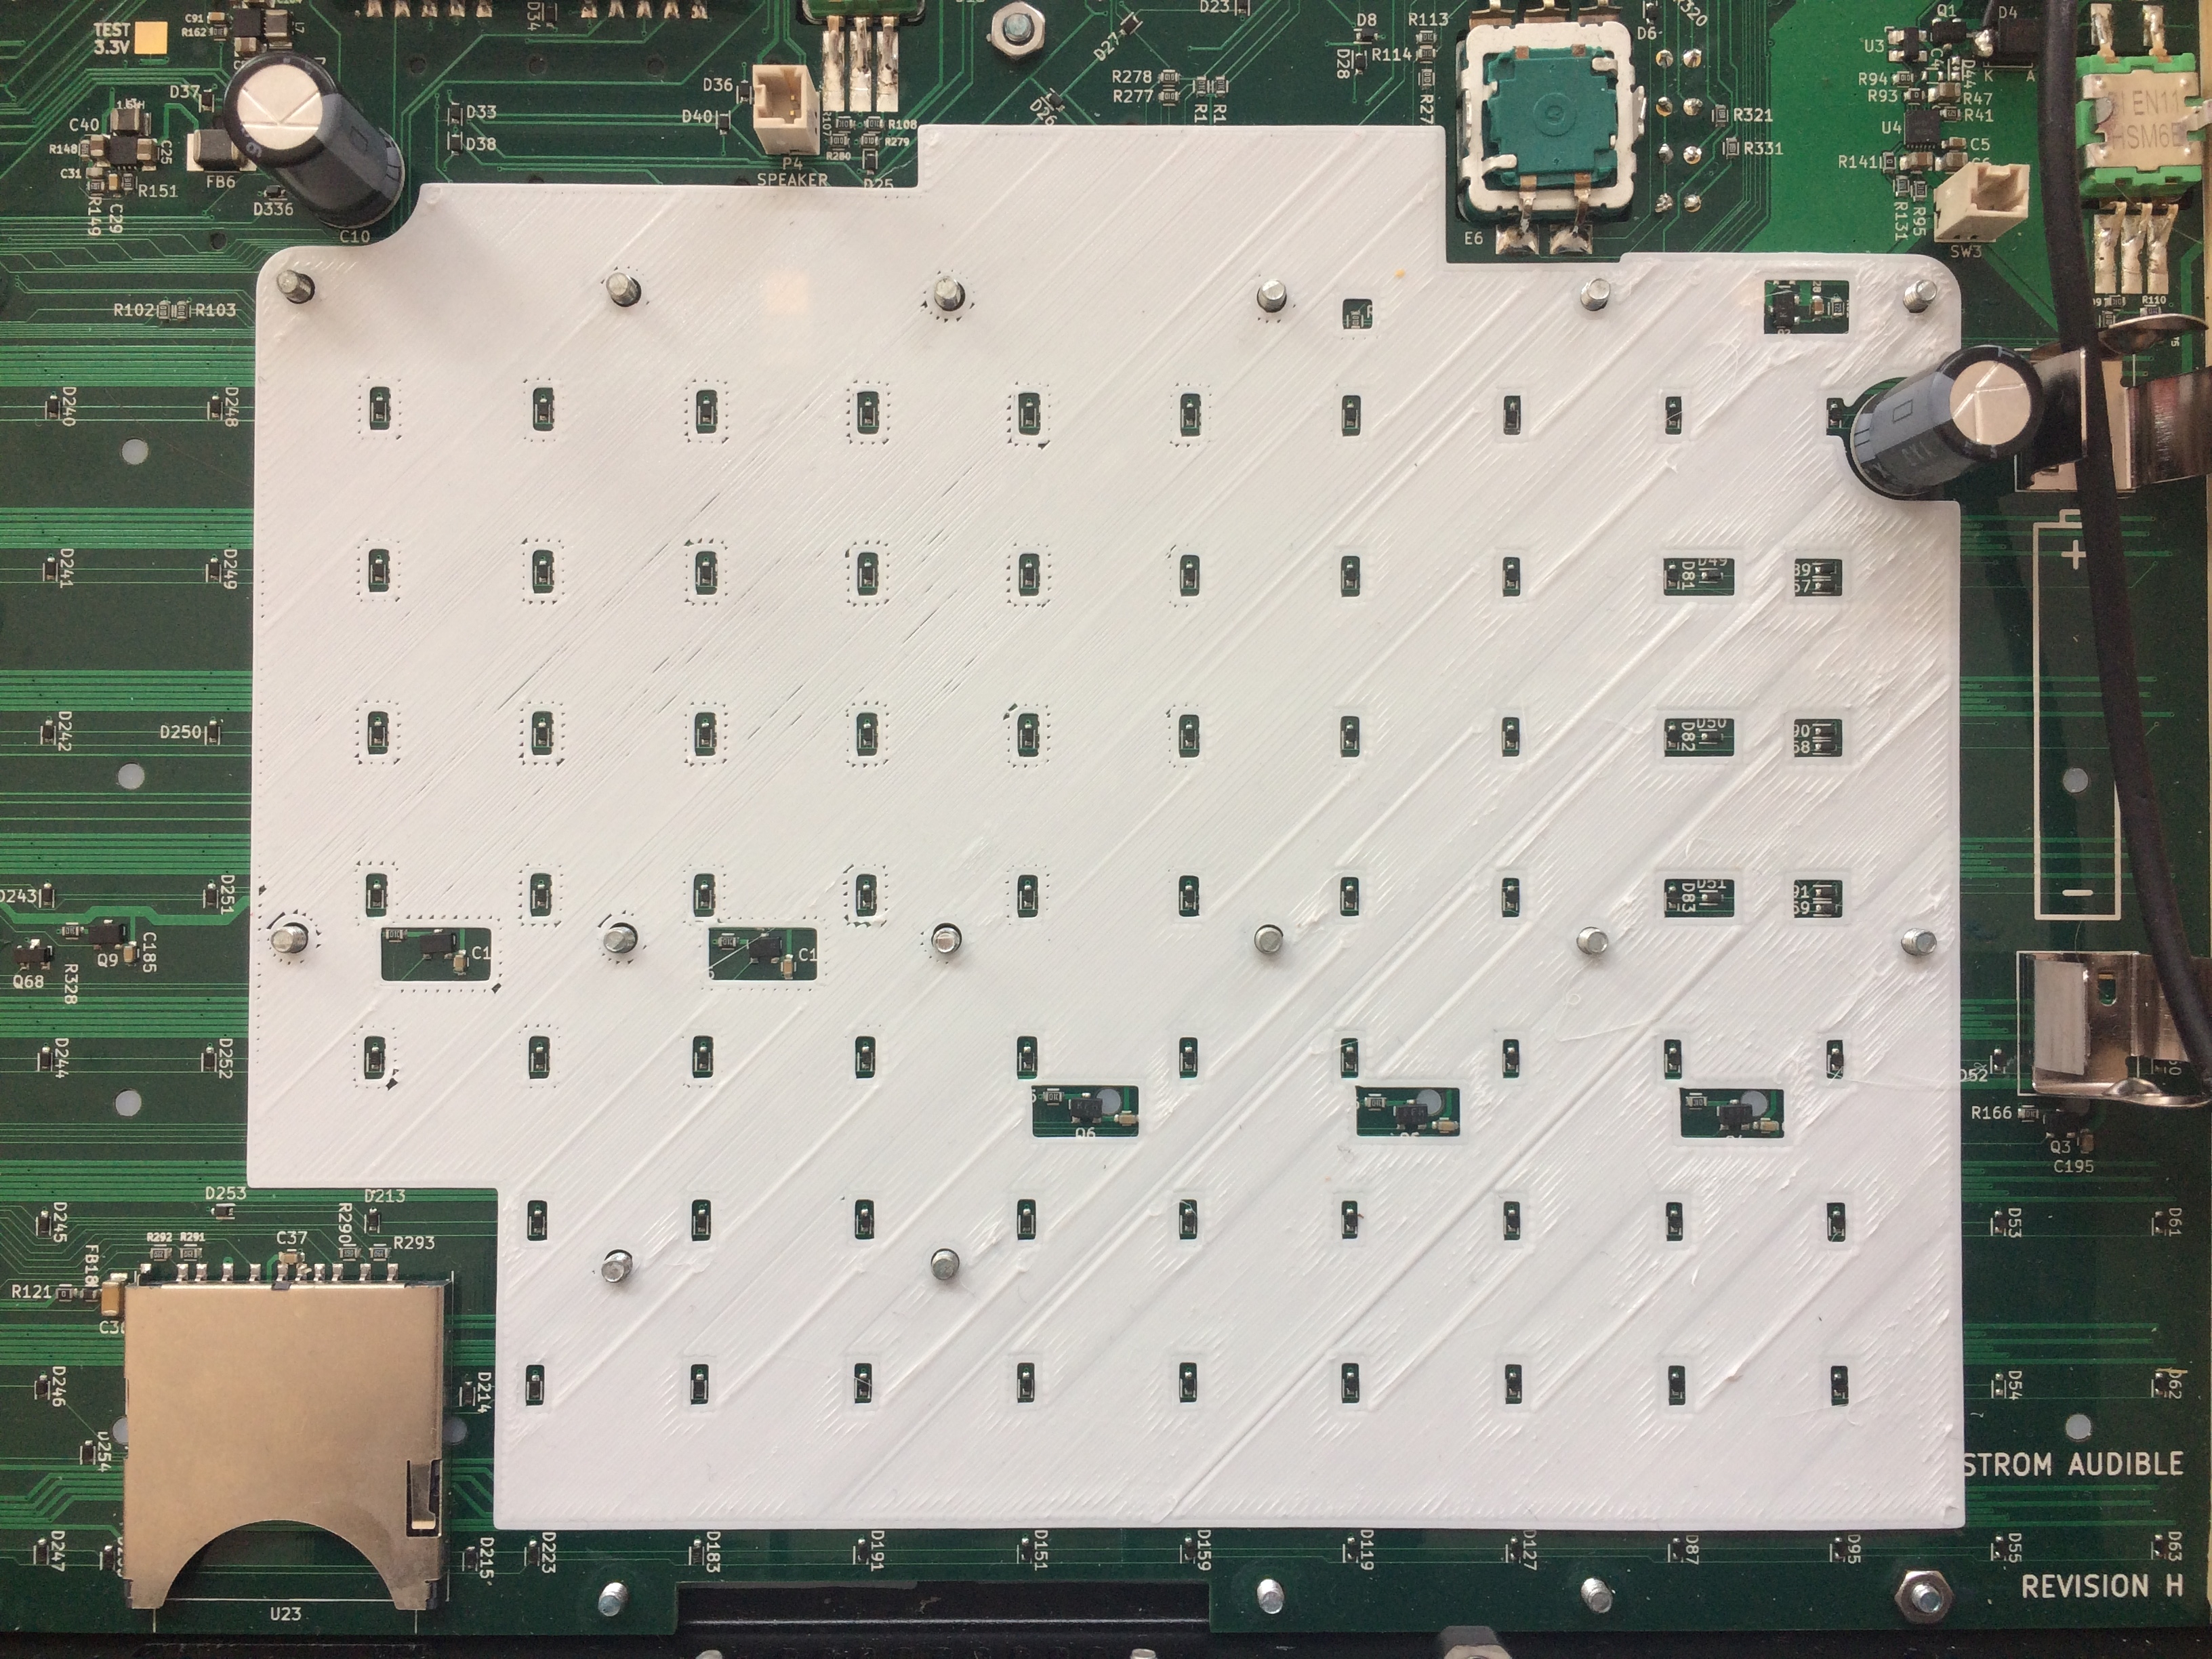
There's a lot of things going on here. First off, this structure is mounted directly to the PCB screw posts, which means there is a hole in the underside for every single component on the PCB. Measuring all of that out and then printing prototypes took the better part of a day, but on the second attempt, everything fit perfectly:
The main reason for this is the tight clearance between the batteries and the diodes on the PCB. If I were to lift the part up and try to save material that way, it wouldn't be strong enough to hold the batteries anymore. There are a few points where the compartments for components are so close that the wall thicknesses become too thin for my printer to print.
You may also notice that there are some tapped screw holes in there. I can not print the thread, as I'm printing at .3mm layer heights they are way too fine, but tap them into the plastic directly. I've done this a few times and it works really well and is surprisingly strong if the thread is long enough.
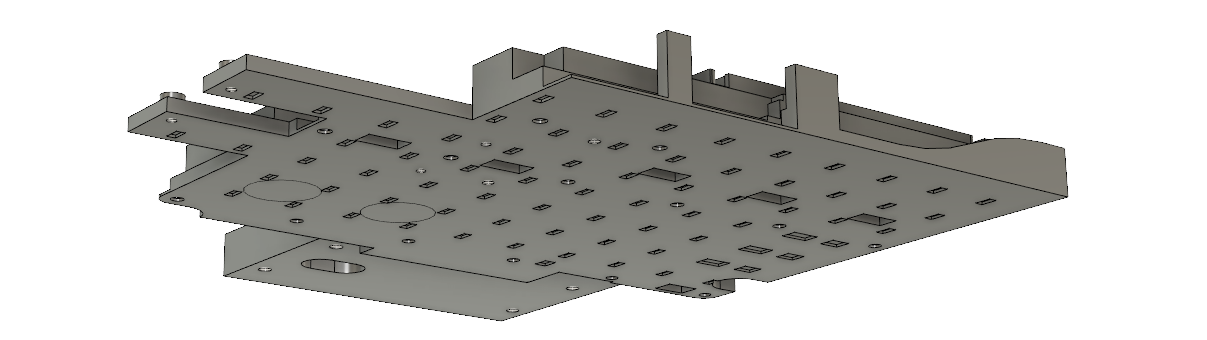
Now, we can get a better idea of how everything will actually be placed:
Next steps
So, this is printing now, will be done in like 7 hours.
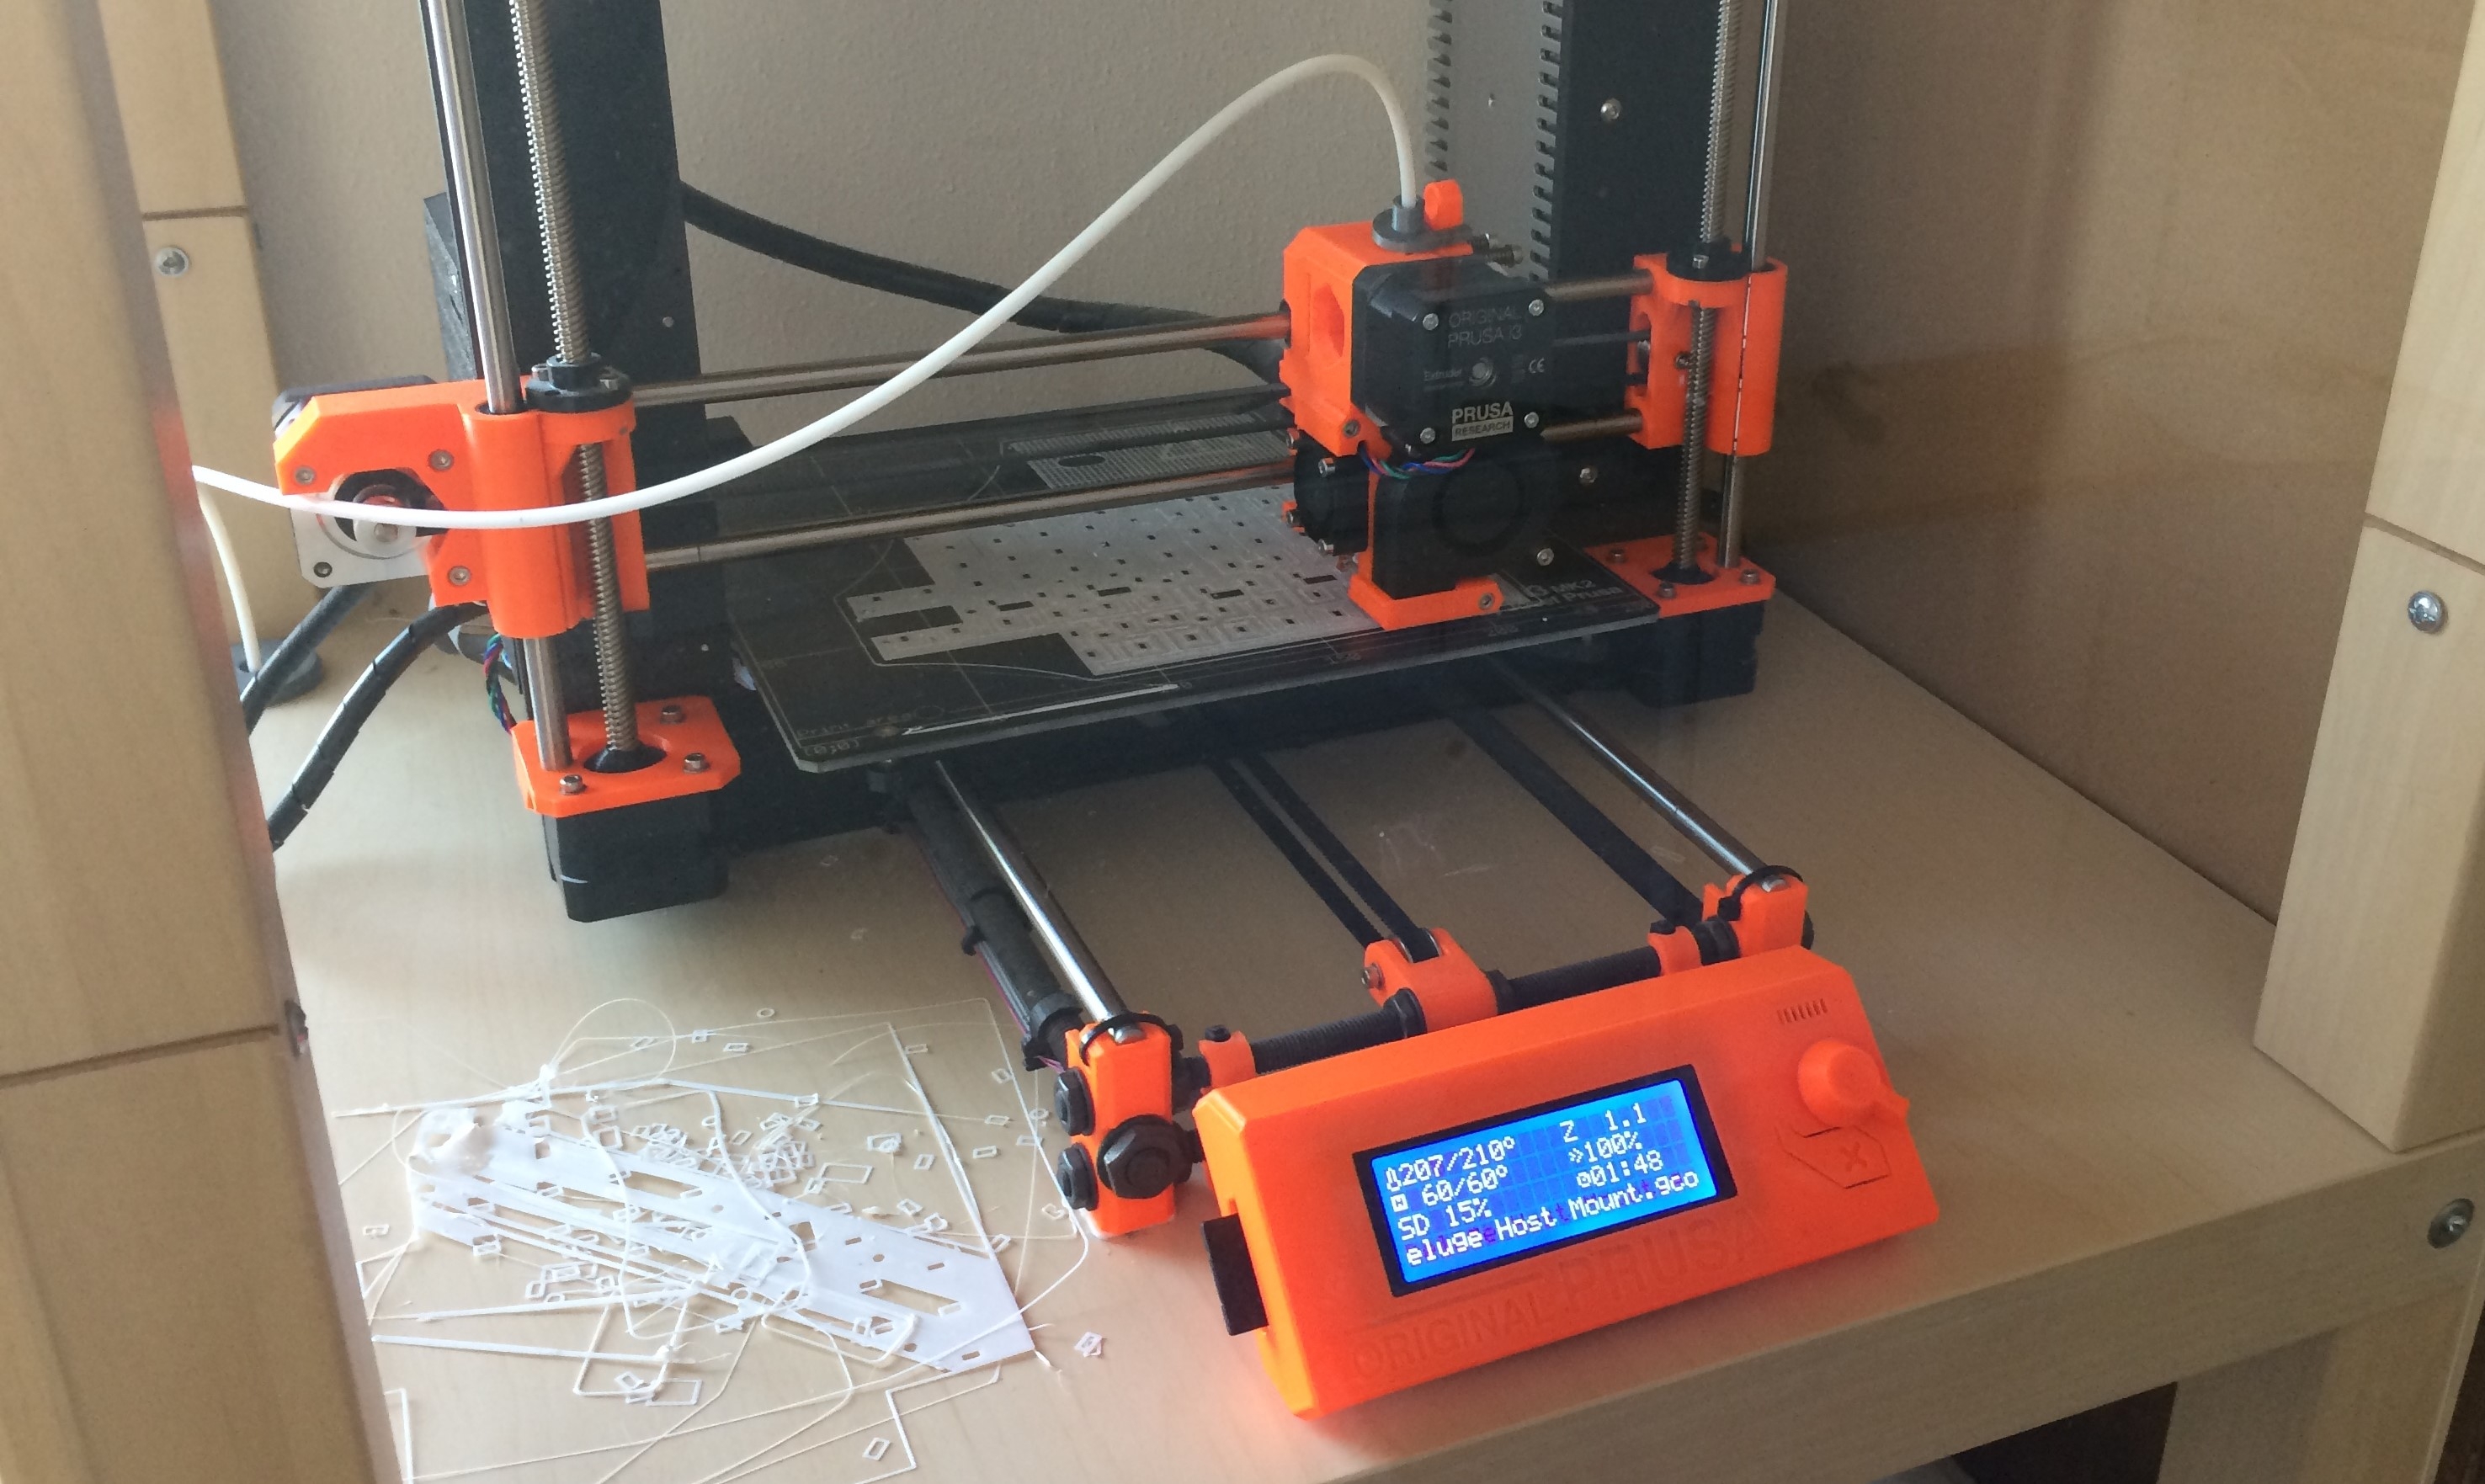
Hopefully everything fits. If it does, I can then start to assemble everything. If not, maybe I can still salvage it. The walls are relatively thick, filing and drilling holes is no problem.
Once everything is in place, I can go on to modding the back panel and soldering everything together.
-
Arpeggiator additions
Yes please, triplets arp sync is direly needed. Maybe (to not make options impossible to wade through), one could use the <> knob to set the "n-ness" of the arp pattern? So you'd select 4/3/5/7/dotted/whatever with <>, and 4bar/2bar/1bar/2nd/4th/8th/16th/32nd/64th with the select knob as is already done.
Could be spelled n(.)-div, like 3-16, 5-4, 4.-32 on the display. This could also be used for LFOs.
Pattern editing would be nice as well, but that seems like a much more sophisticated change. This would require a special Arp View.
Arp View Concept
Arp View is opened automatically when selecting ARP->MODE.
You can then flick through the patterns, which are displayed in a non-scale grid, and edit them as well. Every row of the grid represents one pressed key. So the bottom row is the lowest key, the one above the next key and so on.
Arp patterns could look like this:
UP
DOWN
BOTH
Something custom
One problem is how to allow for up-and-down movements. I solved this by having two separate sections for that. If the arp reaches the rightmost note but there are still higher ones held down, it will start from the left again with the next note being the new "lowest". Once it reached the highest note, it will jump to the section on the right.
Maybe a setting BOUNCE would be enough, though.
With this one could also make triplets sync happen by using triplets mode while editing the pattern, though that would be cumbersome.
-
New Deluge manual / producer guide out now.
@youremostwelcome said:
Hey guys, is this document intended to 'replace' the Deluge manual, or to sit beside it? Ie. do I need both documents, or has this got everything that the original manual has + more?
Seems like the new guide is the definite and only guide. This wording also implies that the new guide will indeed get updates like the old one did.
-
Deluge MIDI Host Mod Buildlog
@OnoSendai said:
Woohooo that sounds awesome!And it will be, too
")
@xap said:
I love that you're doing this, eager to see how the "final" version turns out!You and me both, getting ever closer!
@hurdygurdy said:
Wow, great work. Did a Batterymod myself, and was thinking to add a midimerger to the mix, but going all usb-midi with the RK 005 is an awesome idea. The room in de the deluge is really hackerfriendly. Thanks for sharing!Thanks so much! Out of curiosity, how would that work? Where do the additional midi ports go?
Lil' Update
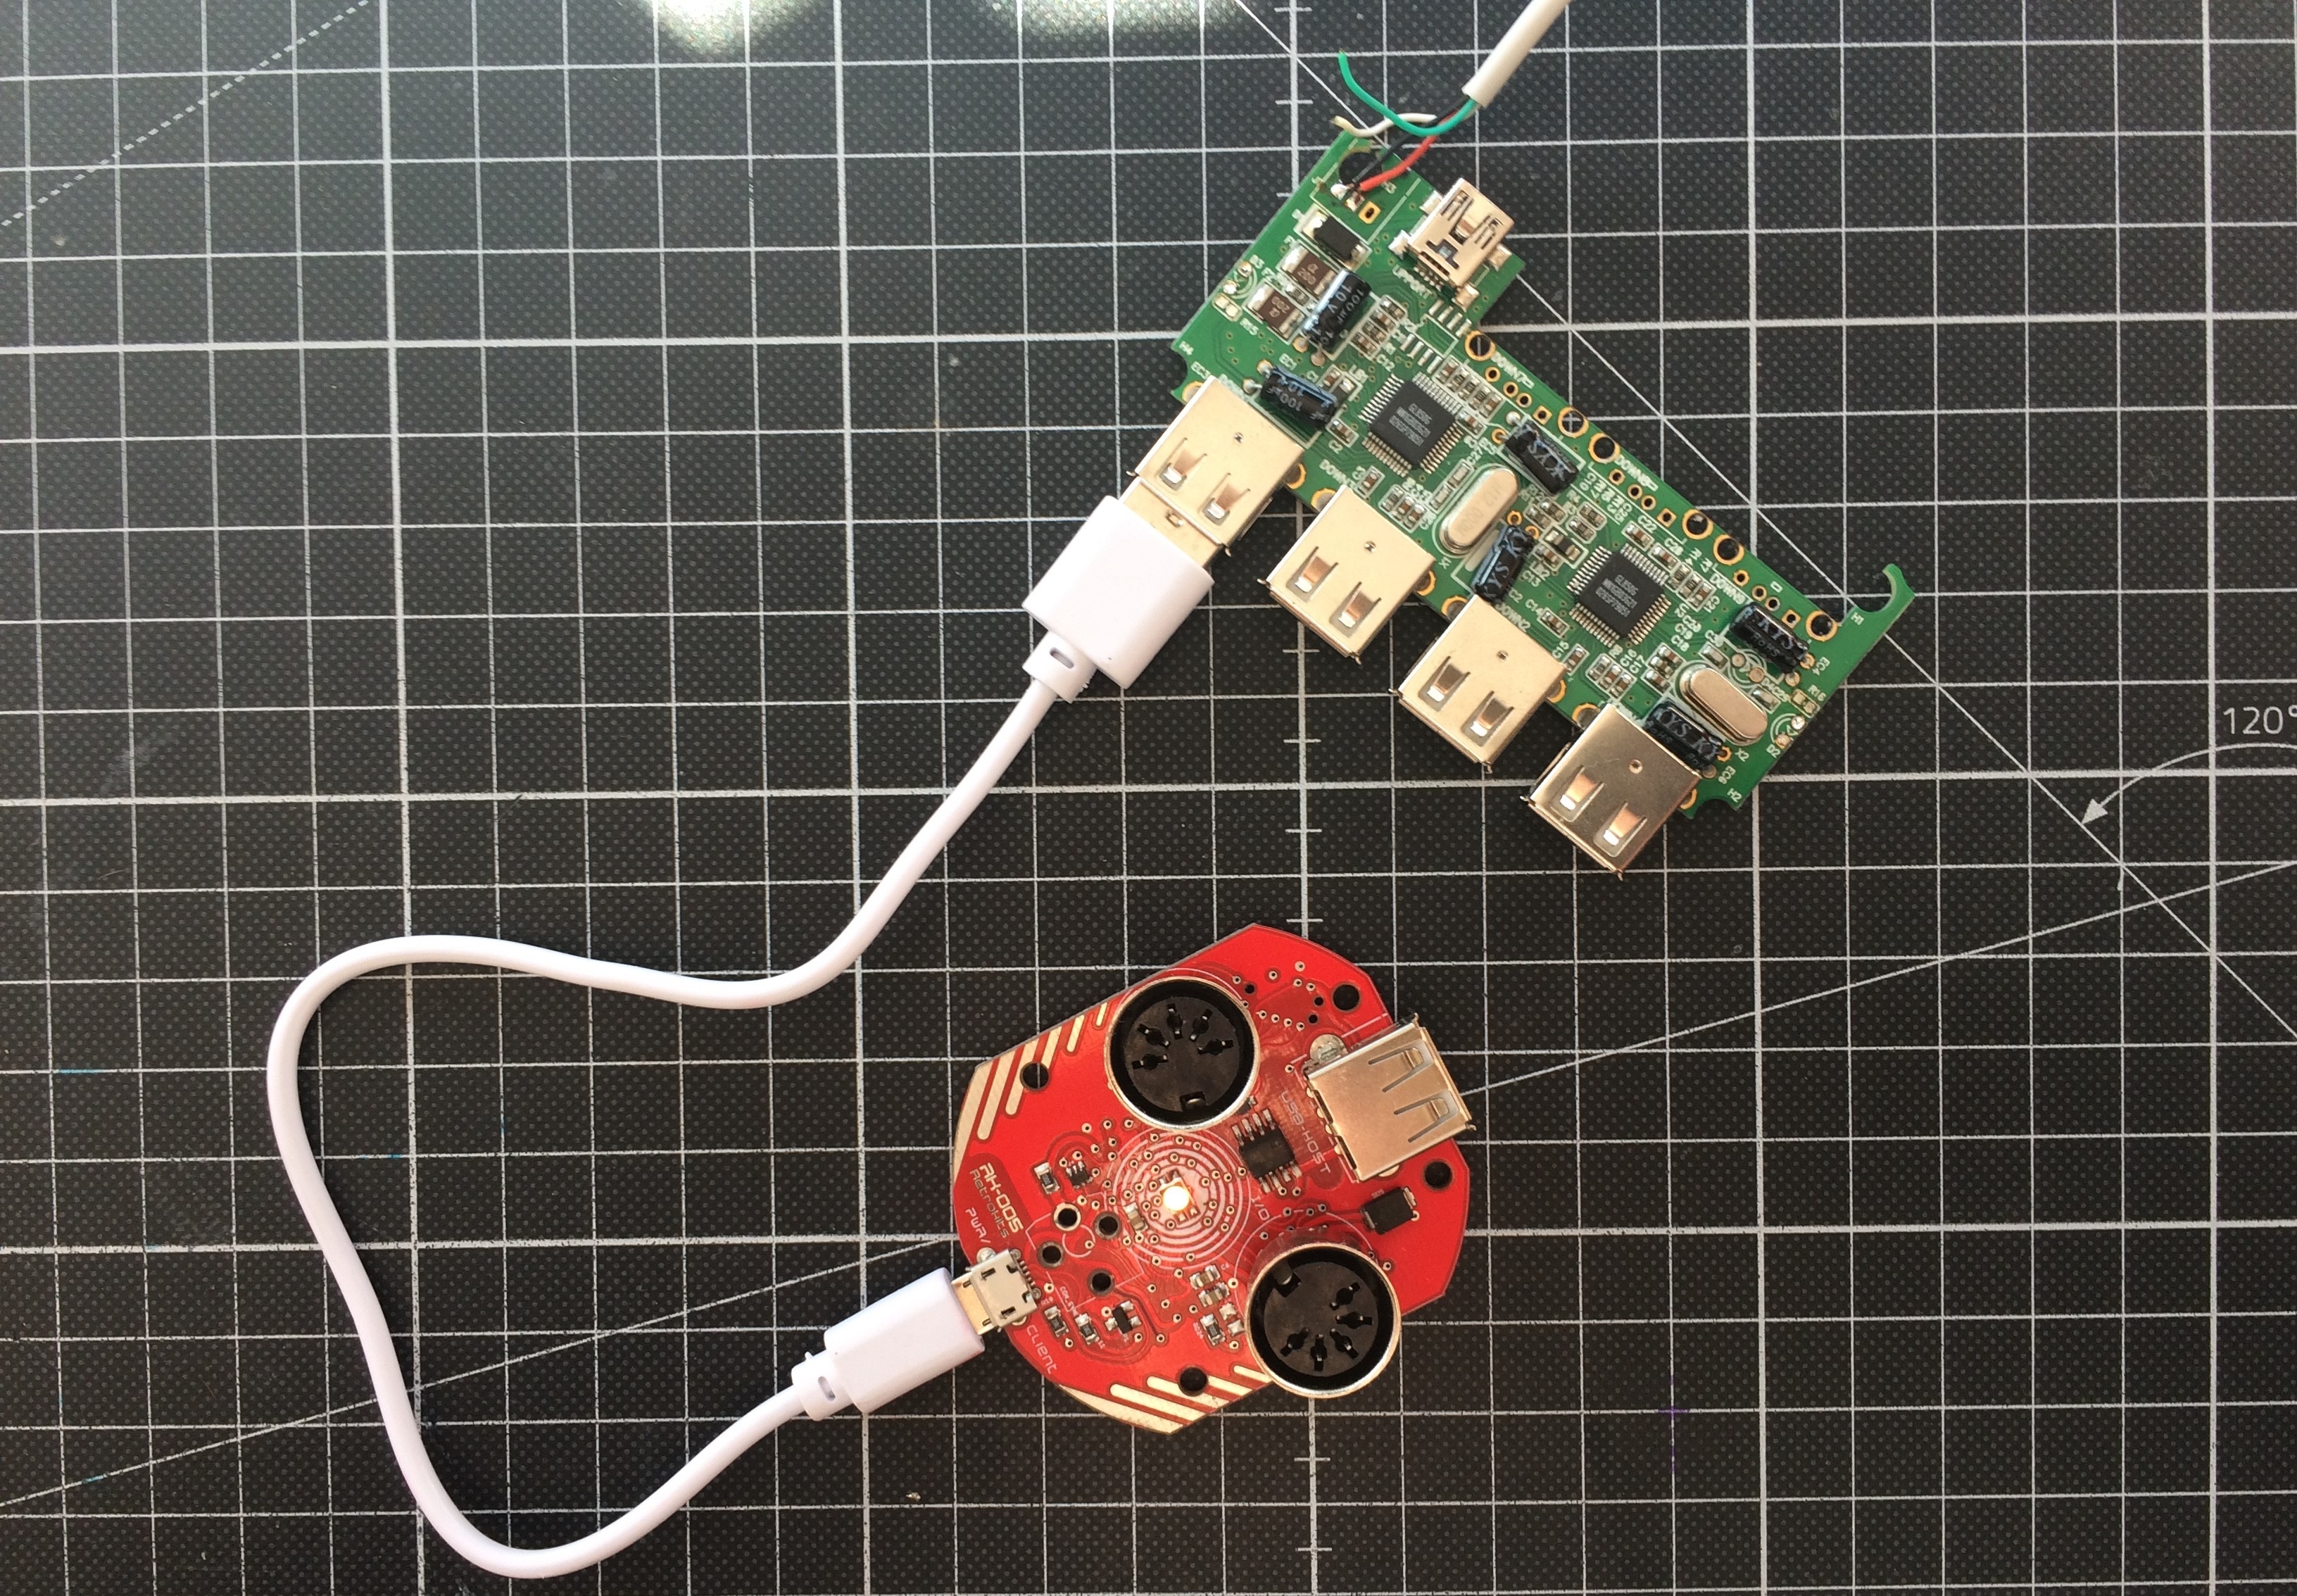
Found out how to fix the RK 005. I just had to solder the 5V to the host port as well. I don't know what it does, maybe detect some voltage drop on the output, but it won't send USB data if there's nothing on the output port, and a simple resistor didn't fool it. Fortunately, GND isn't needed, so there's no ground loops and sound quality is 🔥.
Example of it working:
Final thing is to fix the power issues. My solution will look like this:
A 3PDT switch of some kind, swapping between the three different power modes:
1. Off/Charging
2. External power
3. Battery poweredI'm losing charging while powering, but that feels safer than just splicing the USB cable without the bus being able to handle power draw.
Good night!
